<?xml version="1.0" encoding="utf-8"?><feed xmlns="http://www.w3.org/2005/Atom" xml:lang="en-us"><generator uri="https://gohugo.io/" version="0.123.7">Hugo</generator><title type="html">Posts on Thushan Fernando</title><link href="https://www.thushanfernando.com/posts/" rel="alternate" type="text/html" title="html"/><link href="https://www.thushanfernando.com/posts/feed.xml" rel="alternate" type="application/rss+xml" title="RSS"/><link href="https://www.thushanfernando.com/posts/atom.xml" rel="self" type="application/atom+xml" title="atom"/><updated>2025-11-03T21:58:21+00:00</updated><id>https://www.thushanfernando.com/posts/</id><entry><title type="html">Smash v1.0.0: Fast Duplicate File Finder</title><link href="https://www.thushanfernando.com/2025/07/smash-v1.0.0-fast-duplicate-file-finder/?utm_source=atom_feed" rel="alternate" type="text/html"/><link href="https://www.thushanfernando.com/index.php/2009/11/03/zfs-gets-deduplication/?utm_source=atom_feed" rel="related" type="text/html" title="ZFS gets deduplication"/><link href="https://www.thushanfernando.com/index.php/2009/06/01/net-tools-ndepend-static-analysis-tool-leave-t-pain-behind/?utm_source=atom_feed" rel="related" type="text/html" title=".NET Tools: NDepend Static Analysis Review"/><link href="https://www.thushanfernando.com/index.php/2009/05/01/cool-tool-winrar-390-beta-released-with-some-ubber-goodness/?utm_source=atom_feed" rel="related" type="text/html" title="COOL TOOL: WinRAR 3.90 Beta released with some ubber goodness!"/><id>https://www.thushanfernando.com/2025/07/smash-v1.0.0-fast-duplicate-file-finder/</id><author><name>Thushan Fernando</name></author><published>2025-07-13T00:00:00+00:00</published><updated>2025-07-14T21:46:54+10:00</updated><content type="html"><![CDATA[<blockquote>Smash is a high-performance duplicate file detector that uses an innovative file slicing algorithm to find duplicates 30x faster than traditional tools. Learn how it works and why it&rsquo;s perfect for large datasets.</blockquote><p>After a lot of testing and tweaks, <a href="https://github.com/thushan/smash">Smash v1.0.0</a> is now available. It&rsquo;s a CLI tool I&rsquo;ve been working on for detecting duplicate files in large datasets using a file slicing approach rather than full-file hashing.</p>
<p>This all started with ~2 PB of Aero/Astro data to deduplicate - mostly 300–550 MB binary files, some multi-terrabyte - and traditional hashing just wasn’t going to cut it. Years ago, I wrote a tool called SmartHash (in C/ASM - those were simpler times!), but it was built for a different era &amp; no longer working.</p>
<p>However, you can apply to your music collection, photos (raw files!) and every day downloads/ISOs etc.</p>
<p>Before diving into the internals, it helps to visualise the key difference between traditional full-file hashing and Smash&rsquo;s slicing approach:</p>


<figure >
  
  <img
      
        src="https://www.thushanfernando.com/img/posts/smash-slicing.excalidraw.png"
      
        alt="Full file hashing vs Smash File Slicing for deduplication"


         style="max-width: 100%;"
         />


    <figcaption>
      <span class="img--caption">
        Figure 1. Full file hashing vs Smash File Slicing for deduplication
        
      </span>
    </figcaption>
  
</figure>


<p>
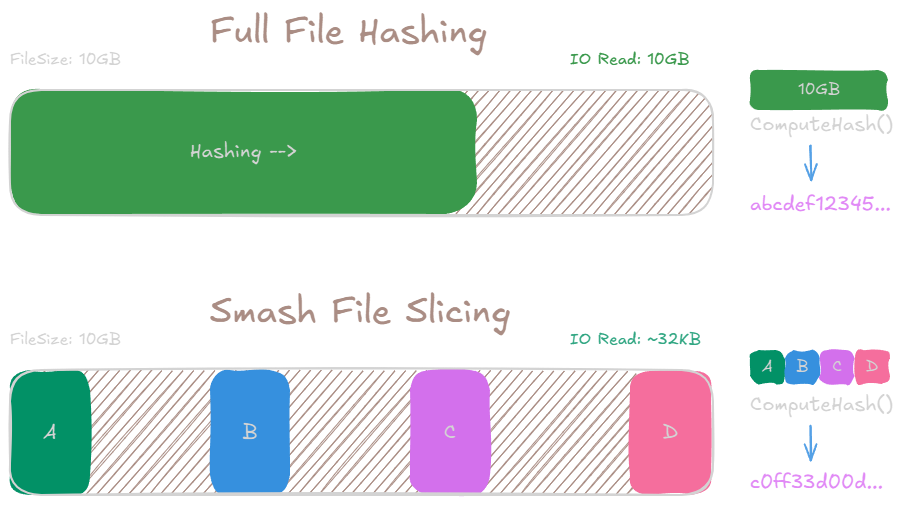
Smash breaks files into fixed slices from strategic positions, hashes each independently and combines them to form a unique signature. This results in dramatically lower I/O overhead, especially when scanning over large datasets or networked storage.</p>
<p>Full-file hashing is still essential when you need cryptographic certainty. If you want to <strong>verify</strong> that two files are <em>exactly</em> the same byte-for-byte, you&rsquo;ll want to hash the entire file. Smash is optimised for the <strong>detection</strong> side - fast, scalable and accurate enough for deduplication at scale.</p>
<p>Once potential duplicates are flagged, you can always fall back to full verification - but only on the reduced set. That’s where the savings really add up.</p>
<h2 id="demo">Demo</h2>
<p>


  <img src="https://vhs.charm.sh/vhs-2IUg01F5Z9p6qEDOoyBHZS.gif" 
       alt="Deduplicating Photos on HDD with Smash" 
       
       loading="lazy"
       decoding="async">
</p>
<p>Find more demos on <a href="https://github.com/thushan/smash">github</a> including <a href="https://github.com/thushan/smash/blob/main/docs/demos.md">VHS Tapes</a>.</p>
<h2 id="smash-em">Smash em!</h2>
<p>You can install smash via:</p>
<pre class="bash-script"><code class="language-">
# Quick install
bash &lt;(curl -s https://raw.githubusercontent.com/thushan/smash/main/install.sh)

# Or via Go
go install github.com/thushan/smash@latest

# Or Docker
docker pull ghcr.io/thushan/smash:v1.0.0
</code></pre>
<p>Basic usage - applies to the docker version too:</p>
<pre class="bash-script"><code class="language-">
# Scan current directory recursively
smash -r

# Generate JSON report
smash -r -o duplicates.json ~/data

# Customise slicing parameters
smash -r --slices=6 --slice-size=16384 ~/large-files
</code></pre>
<p>Read the full <a href="https://github.com/thushan/smash/blob/main/docs/user-guide.md">user guide</a> on github.</p>
<h2 id="report-actions">Report Actions</h2>
<p>Process the JSON output with <code>jq</code>:</p>
<pre class="bash-script"><code class="language-">
# Find all sets of duplicates
jq -r &#39;.analysis.dupes[]&#39; report.json

# List wasted space by file
jq -r &#39;.analysis.dupes[] | &#34;\(.size) bytes: \(.files[0].path)&#34;&#39; report.json

# Generate rm commands for duplicates (keeping first file)
jq -r &#39;.analysis.dupes[].files[1:][] | &#34;rm \&#34;\(.path)\&#34;&#34;&#39; report.json &gt; cleanup.sh
</code></pre>
<h2 id="the-challenge-with-full-file-hashing-for-dedupe">The Challenge with Full-File Hashing (for dedupe)</h2>
<p>Traditional duplicate detection tools has to read and hash entire files (and that&rsquo;s critical for verification). For a 10GB video file, that means reading all 10GB into memory (optimally) and computing a hash. When you&rsquo;re scanning thousands of files or dealing with network-attached storage, this becomes impractical and time consuming.</p>
<h2 id="file-slicing-an-alternate-approach-for-dedupe">File Slicing: An Alternate Approach (for dedupe)</h2>
<p><code>Smash</code> uses a concept of file slicing, which is based on a simple observation: if two files are identical, then any subset of bytes from matching positions will also be identical. Instead of reading entire files, we can read small slices from strategic positions and hash those.</p>
<h3 id="how-the-slicing-algorithm-works">How the Slicing Algorithm Works</h3>
<p>The algorithm works in several stages:</p>
<ol>
<li>
<p><strong>File Size Check</strong>: Files are grouped by size first. Different sized files can&rsquo;t be duplicates.</p>
</li>
<li>
<p><strong>Slice Threshold</strong>: Files smaller than 100KB (configurable) are hashed entirely. The overhead of seeking isn&rsquo;t worth it for small files.</p>
</li>
<li>
<p><strong>Slice Selection</strong>: For larger files, we take 4 slices by default:</p>
<ul>
<li>Slice 1: Bytes 0-8191 (start of file)</li>
<li>Slice 2: Bytes at 33% position</li>
<li>Slice 3: Bytes at 66% position</li>
<li>Slice 4: Last 8192 bytes (end of file)</li>
</ul>
</li>
</ol>
<p>Here&rsquo;s the actual slice calculation from the code:</p>
<pre class="line-numbers"><code class="language-go">
func calculateSlicePositions(fileSize int64, numSlices int, sliceSize int) []SliceInfo {
    slices := make([]SliceInfo, 0, numSlices)
    
    // Always include the beginning
    slices = append(slices, SliceInfo{
        Offset: 0,
        Size:   min(sliceSize, fileSize),
    })
    
    // Calculate intermediate positions
    for i := 1; i &lt; numSlices-1; i&#43;&#43; {
        position := float64(i) / float64(numSlices-1)
        offset := int64(position * float64(fileSize-sliceSize))
        
        slices = append(slices, SliceInfo{
            Offset: offset,
            Size:   sliceSize,
        })
    }
    
    // Always include the end
    if fileSize &gt; sliceSize {
        slices = append(slices, SliceInfo{
            Offset: fileSize - sliceSize,
            Size:   sliceSize,
        })
    }
    
    return slices
}
</code></pre>
<h3 id="why-these-positions">Why These Positions?</h3>
<p>The positions aren&rsquo;t arbitrary:</p>
<ul>
<li><strong>Start of file</strong>: File headers, magic bytes and metadata often differ between files</li>
<li><strong>End of file</strong>: Catches files that might have identical headers but different content</li>
<li><strong>Middle positions</strong>: Samples the file body to catch modifications in the middle</li>
</ul>
<p>For a 10GB file with default settings:</p>
<ul>
<li>Read positions: 0, 3.3GB, 6.6GB, 10GB (minus 8KB)</li>
<li>Total bytes read: 32KB</li>
<li>Percentage of file read: 0.0003%</li>
</ul>
<h3 id="hash-combination">Hash Combination</h3>
<p>Once we have the slices, they&rsquo;re hashed individually and then combined:</p>
<pre class="line-numbers"><code class="language-go">
func (s *Slicer) generateFileSignature(path string, slices []SliceInfo) (string, error) {
    hasher := s.algorithm.New()
    
    for _, slice := range slices {
        data, err := s.readSlice(path, slice.Offset, slice.Size)
        if err != nil {
            return &#34;&#34;, err
        }
        
        hasher.Write(data)
        
        // Include position information to prevent collision
        binary.Write(hasher, binary.LittleEndian, slice.Offset)
    }
    
    return hex.EncodeToString(hasher.Sum(nil)), nil
}
</code></pre>
<p>The position information is crucial - it prevents two files with identical slices at different positions from being marked as duplicates.</p>
<h2 id="performance-analysis">Performance Analysis</h2>
<h3 id="io-reduction">I/O Reduction</h3>
<p>Let&rsquo;s compare the I/O requirements for scanning 1000 video files (10GB each):</p>
<p><strong>Traditional approach:</strong></p>
<pre tabindex="0"><code>Total reads: 1000 files × 10GB = 10TB
Seeks: 1000 (one per file)
Time at 100MB/s: ~28 hours
</code></pre><p><strong>Smash approach:</strong></p>
<pre tabindex="0"><code>Total reads: 1000 files × 32KB = 32MB
Seeks: 4000 (4 per file)
Time at 100MB/s: ~0.3 seconds (+ seek time)
</code></pre><p>Even accounting for seek time (typically 10ms on HDDs), that&rsquo;s:</p>
<pre tabindex="0"><code>Seek time: 4000 × 10ms = 40 seconds
Total time: ~40 seconds vs 28 hours
</code></pre><h2 id="limitations-and-trade-offs">Limitations and Trade-offs</h2>
<p>The slicing approach has trade-offs:</p>
<ol>
<li>
<p><strong>False Negatives</strong>: Theoretically possible if files differ only in unsampled regions. In practice, this is extremely rare for real duplicate files.</p>
</li>
<li>
<p><strong>Seek Performance</strong>: On sequential media (tapes) or high-latency network storage, seeks can be expensive. Use <code>--disable-slicing</code> for these cases.</p>
</li>
<li>
<p><strong>Small File Overhead</strong>: The algorithm switches to full-file hashing for files under 100KB where seeking would add overhead.</p>
</li>
</ol>
<h2 id="benchmarks">Benchmarks</h2>
<p>Performance on different storage types (scanning 10,000 mixed files, ~500GB total):</p>
<pre tabindex="0"><code>Storage Type    | Smash Time | Traditional | Speedup
----------------|------------|-------------|--------
NVMe SSD        | 12s        | 3m 42s      | 18.5x
SATA SSD        | 19s        | 5m 18s      | 16.7x  
7200RPM HDD     | 1m 34s     | 48m 23s     | 30.9x
Network (1Gbps) | 2m 18s     | 1h 12m      | 31.3x
</code></pre><p>The performance gain is most pronounced on slower storage where I/O reduction matters most.</p>
<h2 id="whats-next">What&rsquo;s Next</h2>
<p>The v1.0.0 release marks API stability. Future development focuses on:</p>
<ul>
<li>Caching based on file modification times</li>
<li>Archive support without extraction</li>
<li>Cloud storage integration (S3, GCS, Azure)</li>
<li>Watch mode for real-time duplicate detection</li>
</ul>
<p>The code is Apache 2.0 licensed. Contributions and bug reports are welcome on <a href="https://github.com/thushan/smash">GitHub</a>.</p>
<h2 id="frequently-asked-questions-about-smash">Frequently Asked Questions About Smash</h2>
<h3 id="is-smash-better-than-other-duplicate-file-finders">Is Smash better than other duplicate file finders?</h3>
<p>Smash is optimised for speed on large datasets. It&rsquo;s 18-31x faster than traditional tools that hash entire files. For small collections, the difference is less noticeable, but for terabytes of data, Smash excels.</p>
<h3 id="can-smash-delete-duplicate-files-automatically">Can Smash delete duplicate files automatically?</h3>
<p>No, Smash only detects and reports duplicates. This is by design - automatic deletion is risky. However, you can easily generate deletion scripts from the JSON output using <code>jq</code>.</p>
<h3 id="how-accurate-is-the-file-slicing-algorithm">How accurate is the file slicing algorithm?</h3>
<p>Extremely accurate for real duplicates. The algorithm reads from multiple positions including file headers and endings. False positives are virtually impossible due to position-aware hashing.</p>
<h3 id="does-smash-work-with-cloud-storage">Does Smash work with cloud storage?</h3>
<p>Currently, Smash works with locally mounted drives. Direct cloud storage support (S3, Azure, GCS) is planned for a future release.</p>
<h3 id="what-file-types-work-best-with-smash">What file types work best with Smash?</h3>
<p>Smash works with all file types but shows the biggest performance gains on large files (videos, disk images, archives, RAW photos). Small files under 100KB are hashed entirely.</p>
<h2 id="references">References</h2>
<ol>
<li><a href="https://xxhash.com/">xxHash - Fast non-cryptographic hash algorithm</a></li>
<li><a href="https://github.com/thushan/smash">Smash Source Code</a></li>
<li><a href="https://github.com/thushan/smash/blob/main/docs/algorithms.md">Smash Algorithm Documentation</a></li>
<li><a href="https://github.com/thushan/smash/blob/main/pkg/slicer/slicer.go">File Slicing Implementation</a></li>
<li><a href="https://github.com/thushan/smash/blob/main/docs/user-guide.md">Smash User Guide</a></li>
</ol>
]]></content><category scheme="https://www.thushanfernando.com/categories/projects" term="projects" label="projects"/><category scheme="https://www.thushanfernando.com/tags/go" term="go" label="go"/><category scheme="https://www.thushanfernando.com/tags/golang" term="golang" label="golang"/><category scheme="https://www.thushanfernando.com/tags/tools" term="tools" label="tools"/><category scheme="https://www.thushanfernando.com/tags/performance" term="performance" label="performance"/><category scheme="https://www.thushanfernando.com/tags/cli" term="cli" label="cli"/><category scheme="https://www.thushanfernando.com/tags/docker" term="docker" label="docker"/><category scheme="https://www.thushanfernando.com/tags/deduplication" term="deduplication" label="deduplication"/><category scheme="https://www.thushanfernando.com/tags/file-management" term="file-management" label="file-management"/><category scheme="https://www.thushanfernando.com/tags/smash" term="smash" label="smash"/><category scheme="https://www.thushanfernando.com/tags/file" term="file" label="file"/><category scheme="https://www.thushanfernando.com/tags/dedupe" term="dedupe" label="dedupe"/></entry><entry><title type="html">Converting Proxmox VMs to Containers Easily!</title><link href="https://www.thushanfernando.com/2024/02/converting-proxmox-vms-to-containers-easily/?utm_source=atom_feed" rel="alternate" type="text/html"/><link href="https://www.thushanfernando.com/2023/07/missing-/dev/serial/by-id-on-debian-variants./?utm_source=atom_feed" rel="related" type="text/html" title="Missing /dev/serial/by-id on Debian variants."/><link href="https://www.thushanfernando.com/notes/popos-pipewire-loudness/?utm_source=atom_feed" rel="related" type="text/html" title="PipeWire Loudness Normalisation"/><link href="https://www.thushanfernando.com/notes/proxmox-cifs-setup/?utm_source=atom_feed" rel="related" type="text/html" title="Proxmox: Mounting CIFS Shares in Containers"/><link href="https://www.thushanfernando.com/2022/08/managing-macos-with-brew-bundle-brewfile/?utm_source=atom_feed" rel="related" type="text/html" title="Managing macOS with Brew Bundle Brewfile"/><link href="https://www.thushanfernando.com/2020/08/windows-terminal-setup/?utm_source=atom_feed" rel="related" type="text/html" title="Windows Terminal Setup"/><id>https://www.thushanfernando.com/2024/02/converting-proxmox-vms-to-containers-easily/</id><published>2024-02-01T12:33:56+10:00</published><updated>2024-02-02T17:42:14+11:00</updated><content type="html"><![CDATA[<h1 id="introducing-proxmox-vm-to-ct">Introducing <code>proxmox-vm-to-ct</code></h1>
<div class="center-align">
    <a href="https://github.com/thushan/proxmox-vm-to-ct">


  <img src="/img/posts/proxmox-vm-to-ct/logo.png" 
       alt="Proxmox VM to CT Logo" 
       
       loading="lazy"
       decoding="async">
</a>
</div>
<div class="github-repo align-center">
    <img src="/img/github-mark-white.png" alt="GitHub" width="24" height="24" />
    <a href="https://github.com/thushan/proxmox-vm-to-ct">github.com/thushan/proxmox-vm-to-ct</a>
</div>
<p>With <a href="https://github.com/thushan/proxmox-vm-to-ct">Proxmox VM to CT</a> you can easily convert your existing VMs to a Container by passing in some basic options. Plus it has some extra lean DietPi optimisations for an even more resource efficient DietPi container!</p>
<p>As it&rsquo;s a self-contained bash script, you can grab it easily from <a href="https://github.com/thushan/proxmox-vm-to-ct">the github repo</a>:</p>
<pre class="bash-script"><code class="language-bash">
wget https://raw.githubusercontent.com/thushan/proxmox-vm-to-ct/main/proxmox-vm-to-ct.sh
chmod &#43;x ./proxmox-vm-to-ct.sh
</code></pre>
<p>We just finished migrating just over 200 VMs to containers and templating a few for future musings.</p>
<p>For instance, suppose you have a VM called <code>the-matrix</code> that you want to convert to a container named <code>matrix-reloaded</code> and your Proxmox storage is called <code>local-zfs</code>, you can simply call the script like so:</p>
<pre class="command-line" data-user="root" data-host="proxmox" data-output="2-8">
<code class="language-bash">
./proxmox-vm-to-ct.sh --source the-matrix \
                      --target matrix-reloaded \
                      --storage local-zfs \
                      --default-config
</code>
</pre>
<p>You can even convert VM&rsquo;s that you&rsquo;ve installed Docker, Podman or containerd installations, you can use the <code>--default-config-containerd</code> switch:</p>
<pre class="command-line" data-user="root" data-host="proxmox" data-output="2-8">
<code class="language-bash">
./proxmox-vm-to-ct.sh --source the-matrix \
                      --target matrix-reloaded \
                      --storage local-zfs \
                      --default-config-containerd
</code>
</pre>
<p>If you want to keep the source output from the script for future containers, use the <code>--source-output</code> switch:</p>
<pre class="command-line" data-user="root" data-host="proxmox" data-output="2-8">
<code class="language-bash">
./proxmox-vm-to-ct.sh --source the-matrix \
                      --target matrix-reloaded \
                      --storage local-zfs \
                      --default-config-containerd \
                      --source-output ~/my-first-vm.tar.gz
</code>
</pre>
<p>Then you can reuse that same template to create more containers:</p>
<pre class="command-line" data-user="root" data-host="proxmox" data-output="2-8">
<code class="language-bash">
./proxmox-vm-to-ct.sh --source ~/my-first-vm.tar.gz \
                      --target matrix-revolutions \
                      --storage local-zfs \
                      --default-config-containerd
</code>
</pre>
<p>The <code>--source</code> switch supports two different types of inputs:</p>
<ul>
<li>SSH: IP or Hostname (Eg. <code>192.168.0.101</code> or <code>thematrix.fritz.box</code>)</li>
<li>Archive: GZip root file system (Eg. <code>*.tar.gz</code>)</li>
</ul>
<p>Which renders out something similar to this - on our test rig named <code>gandalf</code>:</p>
<p>


  <img src="/img/posts/proxmox-vm-to-ct/example-run-v1.0.0.png" 
       alt="Example run of v1.0.0" 
       
       loading="lazy"
       decoding="async">
</p>
<h2 id="securely-set-passwords">Securely set passwords</h2>
<p>By default, the script will auto-generate a password for you and set it on the container, but you can opt to have it prompt you for a password with the <code>--prompt-password</code> switch.</p>
<p>It will whip open a <code>whiptail</code> window asking you for a password!</p>
<h2 id="default-configurations">Default Configurations</h2>
<p>The <a href="https://github.com/thushan/proxmox-vm-to-ct?tab=readme-ov-file#default-configuration">default configuration</a> for the script is quite basic, but you can opt to create your own machine/cluster specific configurations inside a (sort of an) env file.</p>
<p>Following the example <a href="https://github.com/thushan/proxmox-vm-to-ct/blob/main/default.config">default.config</a>, create a file with only the settings you want to change from the default:</p>
<pre class="line-numbers"><code class="language-env">
# loggins-cpu.config
CT_CPU=8
CT_RAM=10240
CT_HDD=500
</code></pre>
<p>Then load the configuration overiding the default options:</p>
<pre class="command-line" data-user="root" data-host="proxmox" data-output="2-8">
<code class="language-bash">
./proxmox-vm-to-ct.sh --source ~/my-first-vm.tar.gz \
                      --target kenny-loggins \
                      --storage local-zfs \
                      --default-config \
                      --target-config loggins-cpu.config
</code>
</pre>
<h2 id="dietpi-optimisations">DietPi optimisations</h2>
<p>If your VM is based on DietPi (6.x to 9.x), you can have the script optimise it for Containers by default which is <a href="https://github.com/thushan/proxmox-vm-to-ct?tab=readme-ov-file#dietpi-changes">documented here</a>.</p>
<ul>
<li>Sets the <code>.dietpi_hw_model_identifier</code> from 21 (x86_64) to 75 (container) as <a href="https://github.com/MichaIng/DietPi/blob/master/dietpi/func/dietpi-obtain_hw_model#L27">per documentation</a></li>
<li>Sets up first-login install sequence (even if you&rsquo;ve done it already) so each container gets updates and updating of passwords instead of any randomly generated ones from the script by modifying <code>/boot/dietpi/.installstage</code>.</li>
<li>Stops DietPi-CloudShell which is CloudHell when you reboot as a container in Proxmox otherwise.</li>
<li>Adds the purging of <code>grub-pc tiny-initramfs linux-image-amd64</code> packages which aren&rsquo;t required as a container - <a href="https://dietpi.com/blog/?p=2642#comment-5808">see Michalng&rsquo;s comment</a>.</li>
</ul>
<p>They can be disabled with <code>--ignore-dietpi</code> and won&rsquo;t be done on non-dietpi VMs (like Debian etc).</p>
<h2 id="acknowledgements">Acknowledgements</h2>
<p>This script uses the handiwork by <a href="https://github.com/my5t3ry/machine-to-proxmox-lxc-ct-converter">@my5t3ry/machine-to-proxmox-lxc-ct-converter</a> and in particular the change by <a href="https://github.com/blauskaerm">blauskaerm</a> that <a href="https://github.com/my5t3ry/machine-to-proxmox-lxc-ct-converter/pull/2">tar&rsquo;s up the filesystem</a>.</p>
<h2 id="references">References</h2>
<ul>
<li><a href="https://github.com/thushan/proxmox-vm-to-ct?tab=readme-ov-file#examples">Examples of usage</a></li>
<li><a href="https://github.com/thushan/proxmox-vm-to-ct?tab=readme-ov-file#usage">Usage options</a></li>
<li><a href="https://github.com/thushan/proxmox-vm-to-ct?tab=readme-ov-file#default-configuration">Default Configuration</a></li>
<li><a href="https://github.com/thushan/proxmox-vm-to-ct?tab=readme-ov-file#default-configuration---containerd--docker--podman">Default Containerd Configuration</a></li>
<li><a href="https://github.com/thushan/proxmox-vm-to-ct?tab=readme-ov-file#dietpi-changes">DietPi Changes</a></li>
</ul>
]]></content><category scheme="https://www.thushanfernando.com/categories/proxmox" term="proxmox" label="proxmox"/><category scheme="https://www.thushanfernando.com/categories/linux" term="linux" label="linux"/><category scheme="https://www.thushanfernando.com/categories/how-to" term="how-to" label="how-to"/><category scheme="https://www.thushanfernando.com/categories/dietpi" term="dietpi" label="dietpi"/><category scheme="https://www.thushanfernando.com/categories/debian" term="debian" label="debian"/><category scheme="https://www.thushanfernando.com/tags/linux" term="linux" label="linux"/><category scheme="https://www.thushanfernando.com/tags/dietpi" term="dietpi" label="dietpi"/><category scheme="https://www.thushanfernando.com/tags/proxmox" term="proxmox" label="proxmox"/><category scheme="https://www.thushanfernando.com/tags/vm" term="vm" label="vm"/><category scheme="https://www.thushanfernando.com/tags/container" term="container" label="container"/></entry><entry><title type="html">Missing /dev/serial/by-id on Debian variants.</title><link href="https://www.thushanfernando.com/2023/07/missing-/dev/serial/by-id-on-debian-variants./?utm_source=atom_feed" rel="alternate" type="text/html"/><link href="https://www.thushanfernando.com/2024/02/converting-proxmox-vms-to-containers-easily/?utm_source=atom_feed" rel="related" type="text/html" title="Converting Proxmox VMs to Containers Easily!"/><link href="https://www.thushanfernando.com/notes/popos-pipewire-loudness/?utm_source=atom_feed" rel="related" type="text/html" title="PipeWire Loudness Normalisation"/><link href="https://www.thushanfernando.com/2022/08/managing-macos-with-brew-bundle-brewfile/?utm_source=atom_feed" rel="related" type="text/html" title="Managing macOS with Brew Bundle Brewfile"/><link href="https://www.thushanfernando.com/2020/08/windows-terminal-setup/?utm_source=atom_feed" rel="related" type="text/html" title="Windows Terminal Setup"/><link href="https://www.thushanfernando.com/index.php/2009/05/25/howto-importing-thunderbird-contacts-into-gmail/?utm_source=atom_feed" rel="related" type="text/html" title="HOWTO: Importing Thunderbird contacts into GMail"/><id>https://www.thushanfernando.com/2023/07/missing-/dev/serial/by-id-on-debian-variants./</id><published>2023-07-15T12:33:56+10:00</published><updated>2023-07-15T17:13:50+10:00</updated><content type="html"><![CDATA[<p>Recently I rebuilt my <a href="https://github.com/thushan/3dprinter-configs">3D Printer&rsquo;s Klipper</a> environment setup which is powered via a couple of <a href="https://github.com/thushan/3dprinter-configs">Udoo x86 SBCs</a> that run DietPi for x86_64.</p>
<p>As Klipper talks to the MCU via USB, one needs to find the printer (or device) specific serial port and the easiest way is to get the path via <code>/dev/serial/by-id</code>.</p>
<h2 id="the-problem">The problem</h2>
<p>However, Debian 13 (Bookworm) didn&rsquo;t have <code>/dev/serial/by-id</code> available which I thought was unusual.</p>
<pre class="command-line" data-user="hair" data-host="klipper" data-output="2">
<code class="language-bash">ls -lah /dev/serial/by-id
ls: cannot access '/dev/serial/by-id': No such file or directory
</code>
</pre>
<p>Digging into this, there&rsquo;s a <a href="https://github.com/systemd/systemd/pull/25246">PR25246: udev: fix by-id symlinks </a> by <a href="https://github.com/yuwata">@yuwata</a> from November 2022 for <a href="https://github.com/systemd/">systemd</a> that updates the <a href="https://github.com/systemd/systemd/pull/25246/files">60-serial.rules</a> configuration that broke the path from being created. However this fix hasn&rsquo;t made it&rsquo;s way into the later Debian releases it seems.</p>
<h2 id="the-fix">The Fix</h2>
<p>The easiest way to fix this locally - knowing it will break in the future if you update your system and the file is overwritten, is to simply apply the changes in the change to your Debian source.</p>
<p>Backup your existing <code>60-serial.rules</code> file:</p>
<div class="highlight"><pre tabindex="0" style="color:#f8f8f2;background-color:#272822;-moz-tab-size:4;-o-tab-size:4;tab-size:4;"><code class="language-bash" data-lang="bash"><span style="display:flex;"><span>$ sudo cp /usr/lib/udev/rules.d/60-serial.rules /usr/lib/udev/rules.d/60-serial.rules.bak
</span></span></code></pre></div><p>Then replace it with the PR&rsquo;s changes:</p>
<blockquote class="gistdoc">
    <strong><i class="fa fa-github" aria-hidden="true"></i> Github Raw: <code>60-serial.rules</code></strong><br>
    Get the full raw output from Github Raw: <a href="https://raw.githubusercontent.com/yuwata/systemd/5286da064c97d2ac934cb301066aaa8605a3c8f9/rules.d/60-serial.rules">60-serial.rules</a>.
</blockquote>

<pre class="line-numbers"><code class="language-bash">
# do not edit this file, it will be overwritten on update

ACTION==&#34;remove&#34;, GOTO=&#34;serial_end&#34;
SUBSYSTEM!=&#34;tty&#34;, GOTO=&#34;serial_end&#34;

SUBSYSTEMS==&#34;usb&#34;, IMPORT{builtin}=&#34;usb_id&#34;, IMPORT{builtin}=&#34;hwdb --subsystem=usb&#34;
SUBSYSTEMS==&#34;pci&#34;, ENV{ID_BUS}==&#34;&#34;, ENV{ID_BUS}=&#34;pci&#34;, \
  ENV{ID_VENDOR_ID}=&#34;$attr{vendor}&#34;, ENV{ID_MODEL_ID}=&#34;$attr{device}&#34;, \
  IMPORT{builtin}=&#34;hwdb --subsystem=pci&#34;

# /dev/serial/by-path/, /dev/serial/by-id/ for USB devices
KERNEL!=&#34;ttyUSB[0-9]*|ttyACM[0-9]*&#34;, GOTO=&#34;serial_end&#34;

SUBSYSTEMS==&#34;usb-serial&#34;, ENV{.ID_PORT}=&#34;$attr{port_number}&#34;

IMPORT{builtin}=&#34;path_id&#34;
ENV{ID_PATH}==&#34;?*&#34;, ENV{.ID_PORT}==&#34;&#34;, SYMLINK&#43;=&#34;serial/by-path/$env{ID_PATH}&#34;
ENV{ID_PATH}==&#34;?*&#34;, ENV{.ID_PORT}==&#34;?*&#34;, SYMLINK&#43;=&#34;serial/by-path/$env{ID_PATH}-port$env{.ID_PORT}&#34;

ENV{ID_BUS}==&#34;&#34;, GOTO=&#34;serial_end&#34;
ENV{ID_SERIAL}==&#34;&#34;, GOTO=&#34;serial_end&#34;
ENV{ID_USB_INTERFACE_NUM}==&#34;&#34;, GOTO=&#34;serial_end&#34;
ENV{.ID_PORT}==&#34;&#34;, SYMLINK&#43;=&#34;serial/by-id/$env{ID_BUS}-$env{ID_SERIAL}-if$env{ID_USB_INTERFACE_NUM}&#34;
ENV{.ID_PORT}==&#34;?*&#34;, SYMLINK&#43;=&#34;serial/by-id/$env{ID_BUS}-$env{ID_SERIAL}-if$env{ID_USB_INTERFACE_NUM}-port$env{.ID_PORT}&#34;

LABEL=&#34;serial_end&#34;
</code></pre>
<p>Once done, you can reload the rules with:</p>
<div class="highlight"><pre tabindex="0" style="color:#f8f8f2;background-color:#272822;-moz-tab-size:4;-o-tab-size:4;tab-size:4;"><code class="language-bash" data-lang="bash"><span style="display:flex;"><span>$ sudo udevadm control --reload-rules <span style="color:#f92672">&amp;&amp;</span> sudo udevadm trigger
</span></span></code></pre></div><p>You&rsquo;ll find the <code>/dev/serial/by-id/</code> will have been created and mapped appropriately now :)</p>
<h2 id="why-is-this-important">Why is this important?</h2>
<p>Example, for the following <code>lsusb</code> fragment:</p>
<div class="highlight"><pre tabindex="0" style="color:#f8f8f2;background-color:#272822;-moz-tab-size:4;-o-tab-size:4;tab-size:4;"><code class="language-bash" data-lang="bash"><span style="display:flex;"><span>Bus <span style="color:#ae81ff">001</span> Device 007: ID 8087:0ab6 Intel Corp. UDOO X86
</span></span><span style="display:flex;"><span>Bus <span style="color:#ae81ff">001</span> Device 008: ID 1d50:614e OpenMoko, Inc. rp2040
</span></span><span style="display:flex;"><span>...
</span></span><span style="display:flex;"><span>Bus <span style="color:#ae81ff">001</span> Device 003: ID 1d50:614e OpenMoko, Inc. stm32f407xx
</span></span><span style="display:flex;"><span>Bus <span style="color:#ae81ff">001</span> Device 002: ID 1a86:7523 QinHeng Electronics CH340 serial converter
</span></span></code></pre></div><p>We have the following devices listed - <code>/dev/serial/by-path</code>:</p>
<div class="highlight"><pre tabindex="0" style="color:#f8f8f2;background-color:#272822;-moz-tab-size:4;-o-tab-size:4;tab-size:4;"><code class="language-bash" data-lang="bash"><span style="display:flex;"><span>pci-0000:00:14.0-usb-0:1:1.0-port0 -&gt; ../../ttyUSB0
</span></span><span style="display:flex;"><span>pci-0000:00:14.0-usb-0:2:1.0 -&gt; ../../ttyACM0
</span></span><span style="display:flex;"><span>pci-0000:00:14.0-usb-0:3.4:1.0 -&gt; ../../ttyACM2
</span></span><span style="display:flex;"><span>pci-0000:00:14.0-usb-0:4:1.0 -&gt; ../../ttyACM1
</span></span></code></pre></div><p>But ideally, we&rsquo;d want to know their unique-id - <code>/dev/serial/by-id</code>:</p>
<div class="highlight"><pre tabindex="0" style="color:#f8f8f2;background-color:#272822;-moz-tab-size:4;-o-tab-size:4;tab-size:4;"><code class="language-bash" data-lang="bash"><span style="display:flex;"><span>usb-1a86_USB_Serial-if00-port0 -&gt; ../../ttyUSB0
</span></span><span style="display:flex;"><span>usb-Klipper_rp2040_E66118F5D7109236-if00 -&gt; ../../ttyACM2
</span></span><span style="display:flex;"><span>usb-Klipper_stm32f407xx_43002E000451323333353137-if00 -&gt; ../../ttyACM0
</span></span><span style="display:flex;"><span>usb-UDOO_UDOO_X86__K71212493-if00 -&gt; ../../ttyACM1
</span></span></code></pre></div><p>As the ID above is what we&rsquo;d be saving in the <code>printer.cfg</code> for Klipper.</p>
<pre tabindex="0"><code>[mcu]
serial: /dev/serial/by-id/usb-Klipper_stm32f407xx_43002E000451323333353137-if00 
restart_method: command
...
</code></pre>]]></content><category scheme="https://www.thushanfernando.com/categories/debian" term="debian" label="debian"/><category scheme="https://www.thushanfernando.com/categories/linux" term="linux" label="linux"/><category scheme="https://www.thushanfernando.com/categories/how-to" term="how-to" label="how-to"/><category scheme="https://www.thushanfernando.com/tags/by-id" term="by-id" label="by-id"/><category scheme="https://www.thushanfernando.com/tags/linux" term="linux" label="linux"/><category scheme="https://www.thushanfernando.com/tags/usb" term="usb" label="usb"/><category scheme="https://www.thushanfernando.com/tags/lsmod" term="lsmod" label="lsmod"/><category scheme="https://www.thushanfernando.com/tags/udev" term="udev" label="udev"/><category scheme="https://www.thushanfernando.com/tags/klipper" term="klipper" label="klipper"/><category scheme="https://www.thushanfernando.com/tags/dietpi" term="dietpi" label="dietpi"/><category scheme="https://www.thushanfernando.com/tags/debian" term="debian" label="debian"/><category scheme="https://www.thushanfernando.com/tags/by-id" term="by-id" label="by-id"/></entry><entry><title type="html">Managing macOS with Brew Bundle Brewfile</title><link href="https://www.thushanfernando.com/2022/08/managing-macos-with-brew-bundle-brewfile/?utm_source=atom_feed" rel="alternate" type="text/html"/><link href="https://www.thushanfernando.com/2024/02/converting-proxmox-vms-to-containers-easily/?utm_source=atom_feed" rel="related" type="text/html" title="Converting Proxmox VMs to Containers Easily!"/><link href="https://www.thushanfernando.com/2023/07/missing-/dev/serial/by-id-on-debian-variants./?utm_source=atom_feed" rel="related" type="text/html" title="Missing /dev/serial/by-id on Debian variants."/><link href="https://www.thushanfernando.com/2020/08/windows-terminal-setup/?utm_source=atom_feed" rel="related" type="text/html" title="Windows Terminal Setup"/><link href="https://www.thushanfernando.com/index.php/2009/05/25/howto-importing-thunderbird-contacts-into-gmail/?utm_source=atom_feed" rel="related" type="text/html" title="HOWTO: Importing Thunderbird contacts into GMail"/><link href="https://www.thushanfernando.com/index.php/2009/04/25/think-outside-the-box-getting-virtualbox-2x-running-in-jaunty/?utm_source=atom_feed" rel="related" type="text/html" title="Think outside the box: Getting VirtualBox 2.x running in Jaunty"/><id>https://www.thushanfernando.com/2022/08/managing-macos-with-brew-bundle-brewfile/</id><published>2022-08-27T18:33:56+10:00</published><updated>2023-07-15T16:02:07+10:00</updated><content type="html"><![CDATA[<h2 id="package-management">Package Management</h2>
<p>Package management gives you an easy way to spin up a fresh install of an OS with a known environment of applications ready to go. We&rsquo;ve got very <code>apt</code> or <code>apk</code> or <code>yum</code> package managers for Linux, <code>scoop</code> or <code>choco</code> for Windows and <code>brew</code> for macOS.</p>
<h3 id="life-before-bundles">Life before Bundles</h3>
<p>In the past I&rsquo;ve used a technique to break up the installation and have a bash script run through the installation for me. You can see this in my <a href="https://github.com/thushan/dotfiles/blob/c3f1a0b23a721dc18c4968bd356c48b7feed2310/macos/install-brew.sh">dotprofiles / macos / install-brew.sh</a> file.</p>
<p>Basically:</p>
<div class="highlight"><pre tabindex="0" style="color:#f8f8f2;background-color:#272822;-moz-tab-size:4;-o-tab-size:4;tab-size:4;"><code class="language-bash" data-lang="bash"><span style="display:flex;"><span>BASE<span style="color:#f92672">=(</span>
</span></span><span style="display:flex;"><span>    <span style="color:#75715e"># System</span>
</span></span><span style="display:flex;"><span>    bash-completion
</span></span><span style="display:flex;"><span>    curl
</span></span><span style="display:flex;"><span>    git
</span></span><span style="display:flex;"><span>    htop
</span></span><span style="display:flex;"><span>    ...
</span></span><span style="display:flex;"><span><span style="color:#f92672">)</span>
</span></span><span style="display:flex;"><span>TAPS<span style="color:#f92672">=(</span>
</span></span><span style="display:flex;"><span>    homebrew/cask
</span></span><span style="display:flex;"><span>    homebrew/cask-fonts
</span></span><span style="display:flex;"><span>    tinygo-org/tools
</span></span><span style="display:flex;"><span><span style="color:#f92672">)</span>
</span></span><span style="display:flex;"><span>CASKS<span style="color:#f92672">=(</span>
</span></span><span style="display:flex;"><span>    <span style="color:#75715e"># System</span>
</span></span><span style="display:flex;"><span>    keepassxc
</span></span><span style="display:flex;"><span>    ...
</span></span><span style="display:flex;"><span><span style="color:#f92672">)</span>
</span></span><span style="display:flex;"><span>FONTS<span style="color:#f92672">=(</span>
</span></span><span style="display:flex;"><span>    font-inconsolata
</span></span><span style="display:flex;"><span><span style="color:#f92672">)</span>
</span></span></code></pre></div><p>Then with the powers combined, run through the installation with some tricks:</p>
<div class="highlight"><pre tabindex="0" style="color:#f8f8f2;background-color:#272822;-moz-tab-size:4;-o-tab-size:4;tab-size:4;"><code class="language-shell" data-lang="shell"><span style="display:flex;"><span>show_info <span style="color:#e6db74">&#34;Installing BASE brew packages...&#34;</span>
</span></span><span style="display:flex;"><span>brew install <span style="color:#e6db74">${</span>BASE[@]<span style="color:#e6db74">}</span>
</span></span><span style="display:flex;"><span>show_success <span style="color:#e6db74">&#34;Installing BASE brew packages...Done!&#34;</span>
</span></span></code></pre></div><p>This worked relatively well, but it would install the entire arrays worth of packages - and if you&rsquo;re like me, you&rsquo;ll have more than one Mac to install, so that means commenting out specific bits (or creating another script that seperates them all - which I was too lazy to do it appears!).</p>
<h2 id="brew-bundles">Brew Bundles</h2>
<p>Brew comes with an extra bit of goodness which are called Bundles that lets you do the above but in a much nicer, cleaner way. What&rsquo;s incredibly awesome about Bundles is that we can opt to not only have CLI &amp; Cask applications &amp; fonts, but also Mac Store Apps (mas).</p>
<p>They&rsquo;re stored in a <code>~/Brewfile</code> (by default) and look like this:</p>
<pre tabindex="0"><code>tap &#34;homebrew/cask&#34;
tap &#34;homebrew/cask-fonts&#34;
...
brew &#34;awscli&#34;
brew &#34;diff-so-fancy&#34;
brew &#34;fd&#34;
brew &#34;git&#34;
brew &#34;gnupg&#34;
brew &#34;go&#34;
brew &#34;htop&#34;
...
mas &#34;Amphetamine&#34;, id: 937984704
...
</code></pre><p>You setup your taps at the top, then all the applications (in any tap) and finally the <code>mas</code> entries at the bottom are the Mac App Store applications - like <a href="https://apps.apple.com/au/app/amphetamine/id937984704?mt=12">Amphetamine</a>!</p>
<h2 id="working-with-bundles">Working with Bundles</h2>
<p>If you&rsquo;ve not used <code>brew</code> before, you can <a href="https://brew.sh/">install brew</a> and setup your base environment as you wish.</p>
<h3 id="freeze-your-bundle">Freeze your Bundle</h3>
<p>Much like <code>pip freeze</code> you can create a bundle of your current brew environment by the <code>dump</code> command:</p>
<pre class="command-line" data-user="fleetwood" data-host="mac" data-output="">
<code class="language-bash">
brew bundle dump
</code>
</pre>
<p>This will create a <code>Brewfile</code> in which ever directory you&rsquo;re in akin to the example above. You can opt to name &amp; place this file elsewher with the <code>--file</code> switch:</p>
<pre class="command-line" data-user="fleetwood" data-host="mac" data-output="">
<code class="language-bash">
brew bundle dump --file=~/my-bundles/Brewfile-base
</code>
</pre>
<p>If the file already exists, you&rsquo;ll not be able to overwrite it without the <code>--force</code> switch:</p>
<pre class="command-line" data-user="fleetwood" data-host="mac" data-output="">
<code class="language-bash">
brew bundle dump  --force --file=~/my-bundles/Brewfile-base
</code>
</pre>
<h3 id="applying-your-bundle">Applying your Bundle</h3>
<p>Now that you&rsquo;ve created your <code>Brewfile</code>, how does one import it on a fresh install?</p>
<pre class="command-line" data-user="fleetwood" data-host="mac" data-output="">
<code class="language-bash">
brew bundle install --file=~/my-bundles/Brewfile-base
</code>
</pre>
<p>Or if you have a default <code>~/Brewfile</code> just:</p>
<pre class="command-line" data-user="fleetwood" data-host="mac" data-output="">
<code class="language-bash">
brew bundle install
</code>
</pre>
<p>Depending on what&rsquo;s in there, it may take <em>quite sometime</em> (like XCode!), so be patient, it&rsquo;s brewing!</p>
<h3 id="clean-house-to-match-brewfile">Clean house to match Brewfile</h3>
<p>If you want to ensure that you have a clean environment to match your <code>Brewfile</code> you can ask <code>brew</code> to cleanup your existing packages and ensure only the ones defined are installed with:</p>
<pre class="command-line" data-user="fleetwood" data-host="mac" data-output="">
<code class="language-bash">
brew bundle install --file=~/my-bundles/Brewfile-base
</code>
</pre>
<h2 id="managing-brewfiles">Managing Brewfiles</h2>
<p>Here are some extra tips for managing your <code>Brewfile</code> and making life easier.</p>
<h3 id="best-taps-to-tap">Best Taps to tap</h3>
<p>There are some really nice taps you can place at the top of your <code>Brewfile</code> to make life easier.</p>
<ul>
<li><code>tap &quot;homebrew/cask&quot;</code> - For casks or GUI Applications</li>
<li><code>tap &quot;homebrew/cask-fonts&quot;</code> - For fonts, really useful for installing consistent fonts across installs.</li>
<li><code>tap &quot;homebrew/services&quot;</code> - For background services using <code>launchctl</code> on macOS</li>
<li><code>tap &quot;buo/cask-upgrade&quot;</code> - Upgrade all cask apps via <a href="https://github.com/buo/homebrew-cask-upgrade">Cask-Upgrade Tool</a>.</li>
<li><code>brew mas</code> - This installs the Mac App Store app installation via <a href="https://github.com/mas-cli/mas">mas-cli</a></li>
</ul>
<h3 id="multiple-brewfiles">Multiple Brewfiles</h3>
<p>You can opt for one large <code>Brewfile</code> or as I like to do, layer things based on environment (or machine).</p>
<p>Often, I have a <code>base</code> or <code>min</code> which contains the bare essentials across all environments/machines - which contains things like git, htop, fd, tmux, zsh etc. Then specific brewfiles for circumstances - eg. <code>Brewfile-dev</code> or <code>Brewfile-fleetwoodmac</code> which is specific to FleetwoodMac (the actual Macbook).</p>
<p>Find a pattern that works for you and break up your main Brewfile.</p>
<h2 id="upgrading-easily-with-cask-upgrade">Upgrading easily with <code>cask-upgrade</code></h2>
<p>You can easily upgrade <em>all</em> your Brew Casks with the inclusion of the last tap in that list (<code>tap &quot;buo/cask-upgrade&quot;</code>) with:</p>
<pre class="command-line" data-user="fleetwood" data-host="mac" data-output="">
<code class="language-bash">
brew cu
</code>
</pre>
]]></content><category scheme="https://www.thushanfernando.com/categories/macos" term="macos" label="macos"/><category scheme="https://www.thushanfernando.com/categories/how-to" term="how-to" label="how-to"/><category scheme="https://www.thushanfernando.com/tags/brew" term="brew" label="brew"/><category scheme="https://www.thushanfernando.com/tags/brewfile" term="brewfile" label="brewfile"/><category scheme="https://www.thushanfernando.com/tags/package" term="package" label="package"/><category scheme="https://www.thushanfernando.com/tags/bundle" term="bundle" label="bundle"/></entry><entry><title type="html">Getting started with TinyGo for IoT Development</title><link href="https://www.thushanfernando.com/2020/09/getting-started-with-tinygo-for-iot-development/?utm_source=atom_feed" rel="alternate" type="text/html"/><link href="https://www.thushanfernando.com/index.php/2008/06/27/design-patterns-in-c-java-the-singleton/?utm_source=atom_feed" rel="related" type="text/html" title="Design Patterns in C# &amp; Java : The Singleton."/><link href="https://www.thushanfernando.com/notes/headless-raspberrypi-setup/?utm_source=atom_feed" rel="related" type="text/html" title="Headless With Raspberry Pi"/><link href="https://www.thushanfernando.com/2020/08/windows-terminal-setup/?utm_source=atom_feed" rel="related" type="text/html" title="Windows Terminal Setup"/><link href="https://www.thushanfernando.com/2020/07/wordpress-to-hugo/?utm_source=atom_feed" rel="related" type="text/html" title="WordPress to Hugo"/><id>https://www.thushanfernando.com/2020/09/getting-started-with-tinygo-for-iot-development/</id><published>2020-09-20T07:42:40+00:00</published><updated>2020-09-25T15:32:31+10:00</updated><content type="html"><![CDATA[<h2 id="what-is-tinygo">What is TinyGo?</h2>
<p><a href="https://github.com/tinygo-org/tinygo">TinyGo</a> is a new (<a href="https://news.ycombinator.com/item?id=20474530">ish</a>) LLVM-based Compiler that supports a <a href="https://tinygo.org/lang-support/">subset of the full Go Language</a> and <a href="https://tinygo.org/compiler-internals/datatypes/">data-types</a>, a hardware abstraction layer and it&rsquo;s own runtime implementation (tiny&rsquo;er than Go). Including a leaner number of <a href="https://tinygo.org/lang-support/stdlib/">Go Standard packages</a> all geared towards IoT devices (and target architectures) that need a small footprint (both in binary size and memory utilisation).</p>
<p>As of the latest <a href="https://github.com/tinygo-org/tinygo/releases/tag/v0.15.0">0.15 release</a>, TinyGo now includes support for the popular <a href="https://tinygo.org/microcontrollers/esp32/">ESP32</a> &amp; <a href="https://tinygo.org/microcontrollers/esp8266/">ESP8266</a> microcontrollers with <a href="https://github.com/tinygo-org/tinygo#supported-boardstargets">more boards</a> added frequently. What&rsquo;s even cooler, is you can also muse about with the <a href="https://tinygo.org/microcontrollers/nintendo-switch/">Nintendo Switch</a> and <a href="https://tinygo.org/microcontrollers/gameboy-advance/">Gameboy Advance</a> - though they are still in early development.  If that wasn&rsquo;t enough, you can also build highly optimised Web Assembly builds too.</p>
<p>TinyGo&rsquo;s support for hardware sensors and devices are also maturing with <a href="https://tinygo.org/microcontrollers/drivers/">most of the popular</a> devices <a href="https://github.com/tinygo-org/drivers">supported</a>.</p>
<p>The latest release also brings support for Bluetooth Low Energy (BLE) via the <a href="https://www.nordicsemi.com/Software-and-Tools/Development-Kits/nRF51-DK">Nordic nRF51</a> &amp; <a href="https://www.nordicsemi.com/Software-and-Tools/Development-Kits/nRF52-DK">nRF52</a> SoCs too - like the <a href="https://www.adafruit.com/product/3406">Adafruit Feather nRF52 Kit</a>.</p>
<p>There&rsquo;s a mark-sweep garbage collector (on platforms outside of AVR) which is invoked when the heap is exhausted or when you force a GC Collection via <code>runtime.GC()</code>. One of the smart ways that TinyGo ensures your heap allocations are low is via <a href="https://en.wikipedia.org/wiki/Escape_analysis">escape analysis</a> and where possible, optimise it out.</p>
<p>Go Routines are based on the async-await pattern synonymous with <a href="https://docs.microsoft.com/en-us/dotnet/csharp/programming-guide/concepts/async/">.NET&rsquo;s async/await</a> or <a href="https://developer.mozilla.org/en-US/docs/Learn/JavaScript/Asynchronous/Async_await">Javascript&rsquo;s async/await</a> borrowing the C++ implementation used in CLang/LLVM via <a href="https://llvm.org/docs/Coroutines.html">Coroutines in LLVM</a>. An in-depth write up is available on <a href="https://aykevl.nl/">Ayke van Laethem</a>&rsquo;s blog post on <a href="https://aykevl.nl/2019/02/tinygo-goroutines">Goroutines in TinyGo</a> with examples.</p>
<p>The <a href="https://tinygo.org/compiler-internals/pipeline/">TinyGo compiler pipeline</a> relies heavily on the existing <a href="https://github.com/golang/go/blob/master/src/cmd/compile/README.md">Golang Compiler pipeline</a> and uses it for the parsing and type checking as well as the <a href="https://github.com/golang/go/blob/master/src/cmd/compile/internal/ssa/README.md">SSA construction</a> but before this gets to the LLVM infrastructure, TinyGo has a <em>go</em> at optimising for both memory allocation and size constraints which is then further optimised by the LLVM optimiser and patched for the target architecture before the final binary is baked.</p>


<figure >
  
  <img
      
        src="https://www.thushanfernando.com/img/posts/tinygo-intro/tinygo-compiler.png"
      
        alt="TinyGo Compiler Architecture - The journey from Blink.go to tiny main.hex ready to flash."


         style="max-width: 100%;"
         />


    <figcaption>
      <span class="img--caption">
        Figure 1. TinyGo Compiler Architecture - The journey from Blink.go to tiny main.hex ready to flash.
        
      </span>
    </figcaption>
  
</figure>


<p>They&rsquo;ve documented the <a href="https://tinygo.org/compiler-internals/">TinyGo compiler internals</a>, including how they <a href="https://tinygo.org/compiler-internals/interrupts/">implemented interrupts in TinyGo</a> and the ways they&rsquo;ve <a href="https://tinygo.org/compiler-internals/heap-allocation/">optimised heap allocation</a>.</p>
<h2 id="how-tiny-are-we-talking">How Tiny are we talking?</h2>
<p>Sometimes it&rsquo;s worth taking a simple go example and seeing the compilation in Go (<a href="https://golang.org/dl/">v1.15.2</a>) vs TinyGo (<a href="https://github.com/tinygo-org/tinygo/releases/tag/v0.15.0">v0.15</a>). This was done on Linux (you can also use WSL2) as we can&rsquo;t build Windows binaries for TinyGo yet.</p>
<pre class="line-numbers"><code class="language-go">
package main

func main() {
	println(&#34;hello world&#34;)
}
</code></pre>
<p>Compiling with standard Go Compiler:</p>
<pre class="command-line" data-user="tiny" data-host="go" data-output="">
<code class="language-bash">
go build -o ./helloworld-go helloworld.go
</code>
</pre>
<p>Now with TinyGo:</p>
<pre class="command-line" data-user="tiny" data-host="go" data-output="">
<code class="language-bash">
tinygo build -o ./helloworld-tinygo helloworld.go
</code>
</pre>
<p>The size difference? Quite massive:</p>
<pre tabindex="0"><code>1.2M helloworld-go
21K  helloworld-tinygo
</code></pre><p>That&rsquo;s some serious trimming and optimising, but hangon, what kind of hello world is that? You&rsquo;re not even importing <code>fmt</code>?</p>
<p>OK let&rsquo;s try a <em>real</em> token helloworld:</p>
<pre class="line-numbers"><code class="language-go">
package main

import &#34;fmt&#34;

func main() {
	fmt.Println(&#34;hello fmt world&#34;)
}
</code></pre>
<pre tabindex="0"><code>2.1M helloworld-go
253K helloworld-tinygo
</code></pre><p>Sure it&rsquo;s a little less tiny but still a significantly bit leaner than the go binary.</p>
<p>Here&rsquo;s a smattering of different versions and binary sizes for reference. The first example is <code>Compact</code> and the latter is <code>Standard</code> with Go 1.13 vs 1.15.2 and TinyGo 0.15 vs TinyGo 0.9.</p>


<figure >
  
  <img
      
        src="https://www.thushanfernando.com/img/posts/tinygo-intro/tinygo-comparison.png"
      
        alt="Charting the binary size differences of Go vs TinyGo in KB."


         style="max-width: 100%;"
         />


    <figcaption>
      <span class="img--caption">
        Figure 2. Charting the binary size differences of Go vs TinyGo in KB.
        
      </span>
    </figcaption>
  
</figure>


<p>The raw data:</p>
<pre tabindex="0"><code>1.1M helloworld-compact-go-1.13
1.2M helloworld-compact-go-1.15.2
 21K helloworld-compact-tinygo-0.15
 20K helloworld-compact-tinygo-0.9
2.0M helloworld-standard-go-1.13
2.1M helloworld-standard-go-1.15.2
253K helloworld-standard-tinygo-0.15
149K helloworld-standard-tinygo-0.9
</code></pre><p>Note that the Go binaries are slowly increasing in size too.</p>
<h2 id="setting-up-tinygo">Setting up TinyGo</h2>
<p>Let&rsquo;s take a look at how we get TinyGo setup so you can start writing in TinyGo for your tiny devices. Get the tooling setup, install some awesome goodies for your terminal, setup VSCode to  make it a seamless experience and finally, upload a simple Blinky example to Arduino to test our setup.</p>
<p>For this example, I&rsquo;ll be using an Arduino <a href="https://www.microchip.com/wwwproducts/en/ATmega328p">ATmega 328P</a> based clone made by an Australian company named <a href="https://www.freetronics.com.au">Freetronics</a> called the <a href="https://www.freetronics.com.au/collections/all-products/products/etherten">Freeduino EtherTen</a>.</p>


<figure >
  
  <img
      
        src="https://www.thushanfernando.com/img/posts/tinygo-intro/freeduino-etherten.jpg"
      
        alt="Freeduino EtherTen Arduino Compatible ATmega 328P Board"


         style="max-width: 100%;"
         />


    <figcaption>
      <span class="img--caption">
        Figure 3. Freeduino EtherTen Arduino Compatible ATmega 328P Board
        
      </span>
    </figcaption>
  
</figure>


<p>But if you have any Arduino clone or original or the many supported boards, you&rsquo;ll be able to follow along!</p>
<p>We&rsquo;re going to cover the Windows and macOS install but, you can also run <a href="https://tinygo.org/getting-started/using-docker/">TinyGo via Docker</a>. However, you&rsquo;ll have to flash your device on the host OS as you can&rsquo;t do it within Docker itself.</p>
<h3 id="windows-via-scoop">Windows via <code>scoop</code></h3>
<p>Keep in mind that (currently) we can&rsquo;t compile TinyGo binaries for Windows and it only supports MCU and WASM targets, but we can use TinyGo on Windows via Scoop.</p>
<p>The best thing about <a href="https://scoop.sh/">Scoop</a> is that there&rsquo;s no need for elevated privileges when installing software like <a href="https://chocolatey.org/">Chocolatey</a> needs.</p>
<p>You should already have installed <a href="http://www.golang.org">Go v1.14+</a>, if you haven&rsquo;t, install that first:</p>
<pre class="command-line" data-user="tiny" data-host="go" data-output="">
<code class="language-powershell">
scoop install go
</code>
</pre>
<p>Now let&rsquo;s get TinyGo - the latest is v0.15.0 as of writing:</p>
<pre class="command-line" data-user="tiny" data-host="go" data-output="">
<code class="language-powershell">
scoop install tinygo
</code>
</pre>
<p>The package will update your <code>$PATH</code> to include the location of TinyGo too.</p>
<p>One extra thing we&rsquo;ll do is to include the <a href="https://blog.zakkemble.net/avr-gcc-builds/">AVR-GCC toolchain</a> for our Arduino board, that&rsquo;s also in Scoop.</p>
<pre class="command-line" data-user="tiny" data-host="go" data-output="">
<code class="language-powershell">
scoop install avr-gcc
</code>
</pre>
<p>Verify TinyGo is installed correctly with a <code>version</code> and AVR-GCC Toolchain works with <code>--version</code> flag.</p>
<pre class="command-line" data-user="tiny" data-host="go" data-output="2,4-7">
<code class="language-powershell">
tinygo version
tinygo version 0.15.0 windows/amd64 (using go version go1.15 and LLVM version 10.0.1)
avr-gcc --version
avr-gcc.exe (GCC) 10.1.0
Copyright (C) 2020 Free Software Foundation, Inc.
This is free software; see the source for copying conditions.  There is NO
warranty; not even for MERCHANTABILITY or FITNESS FOR A PARTICULAR PURPOSE.
</code>
</pre>
<h3 id="macos-via-brew">macOS via <code>brew</code></h3>
<p>Installing on macOS is trivial by using <a href="https://brew.sh/">brew</a> by adding the <code>tinygo-org</code> tap. Keep in mind you should have a modern version of <a href="http://www.golang.org">Go v1.14+</a> installed already.</p>
<pre class="command-line" data-user="thushan" data-host="bigmac" data-output="">
<code class="language-bash">
brew tap tinygo-org/tools
brew install tinygo
</code>
</pre>
<p>To setup the AVR-GCC toolchain, add the <a href="https://github.com/osx-cross/homebrew-avr">osx-cross tap</a> and install:</p>
<pre class="command-line" data-user="thushan" data-host="bigmac" data-output="">
<code class="language-bash">
brew tap osx-cross/avr
brew install avr-gcc avrdude
</code>
</pre>
<p>Verify TinyGo is installed correctly with a <code>version</code> and AVR-GCC Toolchain works with <code>--version</code> flag.</p>
<pre class="command-line" data-user="thushan" data-host="bigmac" data-output="2,4-7">
<code class="language-bash">
tinygo version
tinygo version 0.15.0 darwin/amd64 (using go version go1.15 and LLVM version 10.0.1)
avr-gcc --version
avr-gcc (Homebrew AVR GCC 9.3.0) 9.3.0
Copyright (C) 2019 Free Software Foundation, Inc.
This is free software; see the source for copying conditions.  There is NO
warranty; not even for MERCHANTABILITY or FITNESS FOR A PARTICULAR PURPOSE.
</code>
</pre>
<h2 id="install-drivers-for-tinygo">Install drivers for TinyGo</h2>
<p>Once TinyGo is installed, in order to query sensors and other hardware devices, we need to install the drivers.</p>
<p>Easily done via <code>go get</code>:</p>
<pre class="command-line" data-user="tiny" data-host="go" data-output="">
<code class="language-shell">
go get -u tinygo.org/x/drivers
</code>
</pre>
<p>Full set of supported drivers are on the <a href="https://github.com/tinygo-org/drivers">TinyGo Drivers Repo</a>.</p>
<h2 id="setup-tinygo-autocmpl-for-terminals">Setup <code>tinygo-autocmpl</code> for Terminals</h2>
<p>The next step is to setup some terminal goodies for auto-completing TinyGo commands through the <a href="https://github.com/sago35/tinygo-autocmpl"><code>tinygo-autocmpl</code></a> by <a href="https://github.com/sago35">Masaaki Takasago</a>. This makes it super easy for resolving targets and switches for TinyGo on bash and zsh.</p>


<figure >
  
  <img
      
        src="https://www.thushanfernando.com/img/posts/tinygo-intro/tinygo-cli-target.png"
      
        alt="Autocomplete targets and other arguments easily."


         style="max-width: 100%;"
         />


    <figcaption>
      <span class="img--caption">
        Figure 4. Autocomplete targets and other arguments easily.
        
      </span>
    </figcaption>
  
</figure>


<p>First go get it:</p>
<pre class="command-line" data-user="tiny" data-host="go" data-output="">
<code class="language-bash">
go get github.com/sago35/tinygo-autocmpl
</code>
</pre>
<p>Then based on your shell, add the following to your <code>~/.bashrc</code> profile:</p>
<p>For <code>bash</code>:</p>
<div class="highlight"><pre tabindex="0" style="color:#f8f8f2;background-color:#272822;-moz-tab-size:4;-o-tab-size:4;tab-size:4;"><code class="language-bash" data-lang="bash"><span style="display:flex;"><span>eval <span style="color:#e6db74">&#34;</span><span style="color:#66d9ef">$(</span>tinygo-autocmpl --completion-script-bash<span style="color:#66d9ef">)</span><span style="color:#e6db74">&#34;</span>
</span></span></code></pre></div><p>For <code>zsh</code>:</p>
<div class="highlight"><pre tabindex="0" style="color:#f8f8f2;background-color:#272822;-moz-tab-size:4;-o-tab-size:4;tab-size:4;"><code class="language-bash" data-lang="bash"><span style="display:flex;"><span>eval <span style="color:#e6db74">&#34;</span><span style="color:#66d9ef">$(</span>tinygo-autocmpl --completion-script-zsh<span style="color:#66d9ef">)</span><span style="color:#e6db74">&#34;</span>
</span></span></code></pre></div><p>Finally, reload it with:</p>
<div class="highlight"><pre tabindex="0" style="color:#f8f8f2;background-color:#272822;-moz-tab-size:4;-o-tab-size:4;tab-size:4;"><code class="language-shell" data-lang="shell"><span style="display:flex;"><span>source ~/.bashrc
</span></span></code></pre></div><h2 id="setup-vscode-for-tinygo">Setup VSCode for TinyGo</h2>
<p>There&rsquo;s a whole section on <a href="https://tinygo.org/ide-integration/">TinyGo IDE Integration</a>, but if you&rsquo;re using VSCode, get the <a href="https://marketplace.visualstudio.com/items?itemName=tinygo.vscode-tinygo&amp;ssr=false#overview">TinyGo Extension</a> which will update the Go Tool environment variables with the target of your choice too. Bring up the command palette and set the target microcontroller with <code>TinyGo target</code>.</p>


<figure >
  
  <img
      
        src="https://www.thushanfernando.com/img/posts/tinygo-intro/tinygo-target.png"
      
        alt="Set your target microcontroller within VSCode."


         style="max-width: 100%;"
         />


    <figcaption>
      <span class="img--caption">
        Figure 5. Set your target microcontroller within VSCode.
        
      </span>
    </figcaption>
  
</figure>


<p>In the next article, we&rsquo;ll setup <a href="https://www.jetbrains.com/go/">Jetbrains GoLand</a> (which is what I use mostly now).</p>
<h2 id="first-arduino-sketch---blinky">First Arduino Sketch - Blinky</h2>
<p>Now that we&rsquo;ve setup everything, let&rsquo;s get cracking on our first sketch for our Arduino board. The simplest hello world, is that to blink the onboard LED with a delay heartbeat, affectionately we dub this <code>blinky.go</code>.</p>
<p>When you install TinyGo, you&rsquo;ll find some examples in <code>tinygo/src/examples</code>.</p>
<p>Let&rsquo;s get our Arduino&rsquo;s onboard LED to blink for a second, then turn itself off and pulse 5 times.</p>
<pre class="line-numbers"><code class="language-go">
package main

import (
	&#34;machine&#34;
	&#34;time&#34;
)

func main() {
	led := machine.LED
	led.Configure(machine.PinConfig{Mode: machine.PinOutput})
	for {
		led.Low()
		time.Sleep(time.Millisecond * 1000)		

		led.High()
		time.Sleep(time.Millisecond * 1000)
		for i := 0; i &lt; 5; i&#43;&#43; {
			led.Low()
			time.Sleep(time.Millisecond * 250)

			led.High()
			time.Sleep(time.Millisecond * 250)
		}
	}
}
</code></pre>
<p>To upload the above (let&rsquo;s call that <code>blink.go</code>) we simply ask <code>tinygo</code> to <code>flash</code> to the <code>target</code> of <code>arduino</code> (or whichever device you have, the above is portable across a lot of boards).</p>
<p>Here&rsquo;s my output on Windows - note that specifying the port is optional as of TinyGo 0.13+, but you can force specify the port with <code>-port=/dev/[PORT]</code>.</p>
<pre class="command-line" data-user="tiny" data-host="go" data-output="2-29">
<code class="language-bash">
tinygo flash -target arduino src/blink.go

avrdude: AVR device initialized and ready to accept instructions

Reading | ################################################## | 100% 0.01s

avrdude: Device signature = 0x1e950f (probably m328p)
avrdude: NOTE: "flash" memory has been specified, an erase cycle will be performed
         To disable this feature, specify the -D option.
avrdude: erasing chip
avrdude: reading input file "C:\...\tinygo166763415\main.hex"
avrdude: writing flash (996 bytes):

Writing | ################################################## | 100% 0.16s

avrdude: 996 bytes of flash written
avrdude: verifying flash memory against C:\...\tinygo166763415\main.hex:
avrdude: load data flash data from input file C:\...\tinygo166763415\main.hex:
avrdude: input file C:\...\tinygo166763415\main.hex contains 996 bytes
avrdude: reading on-chip flash data:

Reading | ################################################## | 100% 0.13s

avrdude: verifying ...
avrdude: 996 bytes of flash verified

avrdude: safemode: Fuses OK (E:00, H:00, L:00)

avrdude done.  Thank you.
</code>
</pre>
<p>Under the covers, TinyGo uses <code>avrdude</code> to flash the output of the machine code.</p>
<p>Your board should be blinking something like this:</p>


<figure >
  
  <img
      
        src="https://www.thushanfernando.com/img/posts/tinygo-intro/arduino-blink.gif"
      
        alt="TinyGo Blinkn on Arduino."


         style="max-width: 100%;"
         />


    <figcaption>
      <span class="img--caption">
        Figure 6. TinyGo Blinkn on Arduino.
        
      </span>
    </figcaption>
  
</figure>


<h3 id="lets-dive-deeper---machine-package">Let&rsquo;s dive deeper - Machine package</h3>
<p>From the example below, let&rsquo;s take a look at some of the important parts to it specific to TinyGo:</p>
<pre class="line-numbers"><code class="language-go">
import (
	&#34;machine&#34;
	&#34;time&#34;
)
</code></pre>
<p>The <code>machine</code> package is the main backbone (the hardware abstraction layer) to all our interactions with the board or target, for the particular Arduino example above, it&rsquo;s defined in the <a href="https://tinygo.org/microcontrollers/machine/arduino/">Arduino Machine</a> API definition.</p>
<p>When we <a href="https://github.com/tinygo-org/tinygo/wiki/Adding-a-new-board">create a new supported board</a>, we define the mapping of the pins to something meaningful, for example the default onboard LED pin is set to D13. This should be similar across a variety of boards which show board status.</p>
<pre class="line-numbers"><code class="language-go">
const LED Pin = D13
</code></pre>
<p>Outside of the Pin Maps, it contains the processor frequency, bus setup and configuration for that specific board (or target).</p>
<pre class="line-numbers"><code class="language-go">
func main() {
	led := machine.LED
	led.Configure(machine.PinConfig{Mode: machine.PinOutput})    
</code></pre>
<p>In the main, we&rsquo;re first going to configure our LED pin to be an output pin (keep in mind that GPIO pins can be either an input or output configuration), then we can instruct TinyGo to turn our configured <code>led</code> to be ON (<code>led.High()</code>) or OFF (<code>led.Low()</code>).</p>
<pre class="line-numbers"><code class="language-go">
for {
		led.Low()
		time.Sleep(time.Millisecond * 1000)		

		led.High()
		time.Sleep(time.Millisecond * 1000)

</code></pre>
<p>The boiler plate code around these fragments are standard Go code you already know and love - including the <code>for</code> loop and the time package used to delay/<code>sleep</code>.</p>
<p>Next time we&rsquo;re going to dive into some GoRoutines and play with some sensors which is where the real interesting things happen and shows off some TinyGo prowness.</p>
<h2 id="play-in-the-tinygo-playground">Play in the TinyGo Playground</h2>
<p>A really neat little online learning tool is the <a href="https://play.tinygo.org/">TinyGo Playground</a> where you can paste the above example and even play with GoRoutines in TinyGo like in <code>tinygo\src\examples\blinky2</code> - try it with the Phytec reel board.</p>
<h2 id="references">References</h2>
<ul>
<li><a href="https://www.youtube.com/watch?v=c3OA01yX0aM">GoLab 2019 - Small Is Going Big: Go on Microcontrollers</a> excellent presentation from Ron Evans, that piqued my interest in TinyGo last year.</li>
<li><a href="https://aykevl.nl/2018/04/codesize">Code size optimization for microcontrollers</a> Ayke van Laethem&rsquo;s post where he looks at how to tune <code>gcc</code> to emit small binaries</li>
<li><a href="https://aykevl.nl/2018/12/tinygo-interface">Interfaces in TinyGo</a> really interesting look at how TinyGo implements the Go Interfaces &amp; reducing memory allocations and code size.</li>
<li><a href="https://aykevl.nl/2019/02/tinygo-goroutines">Goroutines in TinyGo</a> how TinyGo uses the LLVM coroutines to implement goroutines.</li>
<li><a href="https://aykevl.nl/2019/07/tinygo-plaground-simulator">How the TinyGo Playground simulates hardware</a> which explains how they managed to pull off the  <a href="https://play.tinygo.org/">TinyGo Playground</a>.</li>
<li><a href="https://tinygo.org/compiler-internals/differences-from-go/">Differences from Go</a> to clarify how TinyGo compares.</li>
</ul>
]]></content><category scheme="https://www.thushanfernando.com/categories/go" term="go" label="go"/><category scheme="https://www.thushanfernando.com/categories/developer" term="developer" label="developer"/><category scheme="https://www.thushanfernando.com/categories/iot" term="iot" label="iot"/><category scheme="https://www.thushanfernando.com/tags/tinygo" term="tinygo" label="tinygo"/><category scheme="https://www.thushanfernando.com/tags/iot" term="iot" label="iot"/><category scheme="https://www.thushanfernando.com/tags/esp32" term="esp32" label="esp32"/><category scheme="https://www.thushanfernando.com/tags/esp2885" term="esp2885" label="esp2885"/><category scheme="https://www.thushanfernando.com/tags/arduino" term="arduino" label="arduino"/><category scheme="https://www.thushanfernando.com/tags/nano33" term="nano33" label="nano33"/><category scheme="https://www.thushanfernando.com/tags/nrf52840" term="nrf52840" label="nRF52840"/><category scheme="https://www.thushanfernando.com/tags/teensy" term="teensy" label="teensy"/><category scheme="https://www.thushanfernando.com/tags/scoop" term="scoop" label="scoop"/><category scheme="https://www.thushanfernando.com/tags/avr-gcc" term="avr-gcc" label="avr-gcc"/></entry><entry><title type="html">Windows Terminal Setup</title><link href="https://www.thushanfernando.com/2020/08/windows-terminal-setup/?utm_source=atom_feed" rel="alternate" type="text/html"/><link href="https://www.thushanfernando.com/2024/02/converting-proxmox-vms-to-containers-easily/?utm_source=atom_feed" rel="related" type="text/html" title="Converting Proxmox VMs to Containers Easily!"/><link href="https://www.thushanfernando.com/2023/07/missing-/dev/serial/by-id-on-debian-variants./?utm_source=atom_feed" rel="related" type="text/html" title="Missing /dev/serial/by-id on Debian variants."/><link href="https://www.thushanfernando.com/2022/08/managing-macos-with-brew-bundle-brewfile/?utm_source=atom_feed" rel="related" type="text/html" title="Managing macOS with Brew Bundle Brewfile"/><link href="https://www.thushanfernando.com/index.php/2009/05/25/howto-importing-thunderbird-contacts-into-gmail/?utm_source=atom_feed" rel="related" type="text/html" title="HOWTO: Importing Thunderbird contacts into GMail"/><link href="https://www.thushanfernando.com/index.php/2009/04/25/think-outside-the-box-getting-virtualbox-2x-running-in-jaunty/?utm_source=atom_feed" rel="related" type="text/html" title="Think outside the box: Getting VirtualBox 2.x running in Jaunty"/><id>https://www.thushanfernando.com/2020/08/windows-terminal-setup/</id><published>2020-08-11T18:33:56+10:00</published><updated>2020-08-27T11:27:51+10:00</updated><content type="html"><![CDATA[<h2 id="windows-terminal">Windows Terminal</h2>
<p>The new terminal means we finally don&rsquo;t need to install <a href="https://conemu.github.io/">ConEmu</a> (my favourite), <a href="https://github.com/cbucher/console/wiki/Downloads">Console2</a> or others to manage your terminal shells. For that we get a highly customisable, gpu-accelerated (text engine), tabbed interface and it&rsquo;s <a href="https://github.com/microsoft/terminal">open-source</a>. Windows Terminal v1.0 was announced at <a href="https://devblogs.microsoft.com/commandline/windows-terminal-1-0/">Build 2020 on May 19th, 2020</a>.</p>
<p>You will however require <strong>Windows 10 1903 (build 18362)</strong> or above. This guide focuses on the latest Windows Terminal v1.3 release (<a href="https://devblogs.microsoft.com/commandline/windows-terminal-preview-1-3-release/">in preview as of writing</a>).</p>
<p>We&rsquo;re going to look at:</p>
<ul>
<li>How to configure and setup your Windows Terminal</li>
<li>Customise the look and feel to your liking (themes, text, sizing) including some cool fonts to use!</li>
<li>Include your most used shells, terminals and SSH endpoints.</li>
<li>Configure the start-up so it launches your workspace ready to start!</li>
<li>Work around the need for elevation with a neat little trick like I have above (Powershell at the bottom is elevated!).</li>
</ul>
<blockquote class="gistdoc">
    <strong><i class="fa fa-github" aria-hidden="true"></i> Github Gist: <code>settings.json</code></strong><br>
    My full <a href="https://gist.github.com/thushan/90e9b0fb8b9cbc8eca674509a026adeb">settings.json</a> at the bottom of the article, only relevant snippets are littered throughout the article.
</blockquote>

<h2 id="installing--setting-up">Installing &amp; Setting up</h2>
<p>The easiest way is to install the latest release of <a href="https://aka.ms/terminal">Windows Terminal</a> from the <a href="https://www.microsoft.com/en-au/store/apps/windows">Microsoft Store</a>. In the past, I&rsquo;ve avoided the Microsoft Store (and generally most Windows Store apps on my desktop - going so far as to remove all it out of my installs!) but not anymore!</p>
<p>Alternatively, you can use a package manager like <a href="https://chocolatey.org/packages/microsoft-windows-terminal">choco</a> or the official package manager for Windows now, <a href="https://github.com/microsoft/winget-cli">winget</a>.</p>


<div class="tabset">


  <input type="radio" name="windows-terminal-install" id="windows-terminal-install-0" aria-controls="windows-terminal-install-0" checked="checked">
  <label for="windows-terminal-install-0">choco</label>


  <input type="radio" name="windows-terminal-install" id="windows-terminal-install-1" aria-controls="windows-terminal-install-1">
  <label for="windows-terminal-install-1">winget</label>


<div class="tab-panels">


<section id="windows-terminal-install-0" class="tab-panel">
    <p>
	
		<!-- raw HTML omitted -->
<!-- raw HTML omitted -->

	
    </p>
</section>


<section id="windows-terminal-install-1" class="tab-panel">
    <p>
	
		<!-- raw HTML omitted -->
<!-- raw HTML omitted -->

	
    </p>
</section>

</div>
</div>
<p>Once installed, when you launch Windows Terminal, you&rsquo;ll notice it&rsquo;s picked up a few default shells for you already (the down arrow next to the PLUS icon at the top), including the default Command Shell, PowerShell and WSL if you have it already installed.</p>
<h2 id="customising">Customising</h2>
<p>Themes are called Schemas and it allows total customisability of the terminal via a <code>settings.json</code> file that&rsquo;s automatically reloaded as you make changes. You can get to this file by the down arrow then Settings or, hit <kbd>CTRL</kbd> 
<kbd>,</kbd> 
. It will either open the file in Notepad or in Visual Studio Code if it&rsquo;s installed.</p>
<p>Alternatively, you can find it at <code>%LOCALAPPDATA%\Packages\Microsoft.WindowsTerminal_8wekyb3d8bbwe\LocalState</code>.</p>
<h3 id="guid-advice">GUID Advice</h3>
<p>Before customising or getting inspiration from someone&rsquo;s profile, it&rsquo;s important you generate your own profile <code>guid</code>s so it&rsquo;s unique to you for the profile <code>list</code>.</p>
<pre class="line-numbers"><code class="language-json">
{
  &#34;guid&#34;: &#34;{00000000-0000-0000-ba54-000000000002}&#34;,
  &#34;name&#34;: &#34;Git Bash&#34;,
  &#34;commandline&#34;: &#34;\&#34;%PROGRAMFILES%\\git\\usr\\bin\\bash.exe\&#34; -i -l&#34;
},
{
  &#34;guid&#34;: &#34;{61c54bbd-c2c6-5271-96e7-009a87ff44bf}&#34;,
  &#34;name&#34;: &#34;PowerShell&#34;,
  &#34;commandline&#34;: &#34;powershell.exe&#34;,
},
{
  &#34;guid&#34;: &#34;{62c54bbd-c2c6-5271-96e7-009a87ff44bf}&#34;,
  &#34;name&#34;: &#34;PowerShell (admin)&#34;,
  &#34;commandline&#34;: &#34;gsudo powershell.exe&#34;,
}
</code></pre>
<p>You can also refence the GUID in the <code>defaultProfile</code> setting at the top of the file too.</p>
<pre class="line-numbers"><code class="language-json">
{
  &#34;$schema&#34;: &#34;https://aka.ms/terminal-profiles-schema&#34;,

  // Bash always.
  &#34;defaultProfile&#34;: &#34;{00000000-0000-0000-ba54-000000000002}&#34;  
</code></pre>
<p>You can generate GUIDs easily via the terminal itself - remember the days when you used <code>GuidGen</code>?</p>


<div class="tabset">


  <input type="radio" name="windows-terminal-guid" id="windows-terminal-guid-0" aria-controls="windows-terminal-guid-0" checked="checked">
  <label for="windows-terminal-guid-0">PowerShell</label>


  <input type="radio" name="windows-terminal-guid" id="windows-terminal-guid-1" aria-controls="windows-terminal-guid-1">
  <label for="windows-terminal-guid-1">Linux</label>


<div class="tab-panels">


<section id="windows-terminal-guid-0" class="tab-panel">
    <p>
	
		<!-- raw HTML omitted -->
<!-- raw HTML omitted -->

	
    </p>
</section>


<section id="windows-terminal-guid-1" class="tab-panel">
    <p>
	
		<!-- raw HTML omitted -->
<!-- raw HTML omitted -->

	
    </p>
</section>

</div>
</div>
<p>Otherwise, there&rsquo;s always <a href="https://www.guidgenerator.com/">GuidGenerator</a>. It&rsquo;s all GUID!</p>
<h3 id="themes-or-schemas">Themes or Schemas</h3>
<p>You can go crazy trying to find that perfect colour scheme for your terminal (or individual terminals too!) and your one stop shop these days should be <a href="https://atomcorp.github.io/themes/">AtomCorp&rsquo;s Theme Factory</a> or the <a href="https://aka.ms/terminal-color-schemes">Official Theme Park</a>. Click &lsquo;Get Theme&rsquo; which copies it to your clipboard and conveniently paste it into your <code>settings.json</code> file under the <code>schemas</code> section:</p>
<p><pre class="line-numbers"><code class="language-json">
&#34;schemes&#34;: [
    {
        &#34;name&#34;: &#34;Darkside&#34;,
        &#34;black&#34;: &#34;#000000&#34;,
        &#34;red&#34;: &#34;#e8341c&#34;,
        &#34;green&#34;: &#34;#68c256&#34;,
        &#34;yellow&#34;: &#34;#f2d42c&#34;,
        &#34;blue&#34;: &#34;#1c98e8&#34;,
        &#34;purple&#34;: &#34;#8e69c9&#34;,
        &#34;cyan&#34;: &#34;#1c98e8&#34;,
        &#34;white&#34;: &#34;#bababa&#34;,
        &#34;brightBlack&#34;: &#34;#000000&#34;,
        &#34;brightRed&#34;: &#34;#e05a4f&#34;,
        &#34;brightGreen&#34;: &#34;#77b869&#34;,
        &#34;brightYellow&#34;: &#34;#efd64b&#34;,
        &#34;brightBlue&#34;: &#34;#387cd3&#34;,
        &#34;brightPurple&#34;: &#34;#957bbe&#34;,
        &#34;brightCyan&#34;: &#34;#3d97e2&#34;,
        &#34;brightWhite&#34;: &#34;#bababa&#34;,
        &#34;background&#34;: &#34;#222324&#34;,
        &#34;foreground&#34;: &#34;#bababa&#34;
    }
]
</code></pre>
You can then set the default schema or theme in the <code>defaults</code> section of the profile.</p>
<pre class="line-numbers"><code class="language-json">
  &#34;profiles&#34;: {
    &#34;defaults&#34;: {
        // Put settings here that you want to apply to all profiles.        
        &#34;colorScheme&#34;: &#34;Darkside&#34;,
        ...
</code></pre>
<p>In the same <code>defaults</code> section you can configure your font sizing and faces too. Which is covered in the next subsection.</p>
<p>If you want a specific shell or terminal to use a special schema, set that within it&rsquo;s profile - Ubuntu gets Hybrid, PowerShell gets Pandora:</p>
<pre class="line-numbers"><code class="language-json">
    &#34;list&#34;: [
      {
          &#34;guid&#34;: &#34;{2c4de342-38b7-51cf-b940-2309a097f518}&#34;,
          &#34;name&#34;: &#34;Ubuntu&#34;,
          &#34;colorScheme&#34;: &#34;Hybrid&#34;,
          &#34;source&#34;: &#34;Windows.Terminal.Wsl&#34;,
          &#34;hidden&#34;: false
      },
      {
        &#34;guid&#34;: &#34;{61c54bbd-c2c6-5271-96e7-009a87ff44bf}&#34;,
        &#34;name&#34;: &#34;PowerShell&#34;,
        &#34;commandline&#34;: &#34;powershell.exe&#34;,
        &#34;colorScheme&#34;: &#34;Pandora&#34;,
        &#34;hidden&#34;: false,
      }
</code></pre>
<h3 id="pixel-perfect-fonts">Pixel Perfect Fonts</h3>
<p>You want the text you read on your terminal sessions to be crisp and clear, plus with GPU accelerated text rendering, we want all that lovely hinting!</p>
<p>There are two awesome fonts to consider, <a href="https://github.com/Microsoft/Cascadia-Code">Cascadia-Code</a> and <a href="https://www.nerdfonts.com/">Nerds Font</a>. It takes popular fonts and adds a host of merged glyphs to provide crisp detail and great visualisations (the above screenshot uses Nerd Fonts for my PowerShell terminals).</p>
<p>The easiest guide to follow to setup fonts would be <a href="https://admcpr.com">Adam Cooper</a>&rsquo;s <a href="https://admcpr.com/automating-the-patching-of-cascadia-code-to-include-nerd-fonts/">Automating the patching of Cascadia Code to include Nerd Fonts</a>. His <a href="https://github.com/adam7/delugia-code">Github Repo</a> already contains the patched fonts to make life so much easier too.</p>
<p>Set the fonts per profile default:</p>
<pre class="line-numbers"><code class="language-json">
&#34;profiles&#34;: {
    &#34;defaults&#34;: {
        &#34;colorScheme&#34;: &#34;Espresso&#34;,
        &#34;fontSize&#34;: 10,
        &#34;fontFace&#34;: &#34;Cascadia Mono&#34;,
    }
</code></pre>
<p>Or as I do individually:</p>
<pre class="line-numbers"><code class="language-json">
{
    &#34;guid&#34;: &#34;{61c54bbd-c2c6-5271-96e7-009a87ff44bf}&#34;,
    &#34;name&#34;: &#34;PowerShell&#34;,
    &#34;commandline&#34;: &#34;powershell.exe&#34;,
    &#34;fontFace&#34;:  &#34;Delugia Nerd Font&#34;,
    &#34;background&#34; : &#34;#1e1f29&#34;,
}
</code></pre>
<p>Yes I mix my fonts and my colours, but you don&rsquo;t have to!</p>
<h3 id="install-powershell-core">Install Powershell Core</h3>
<p><a href="https://github.com/PowerShell/PowerShell">PowerShell Core</a> is the multi-platform version of Powershell (finally!), you&rsquo;ll probably want to make it your primary terminal.</p>


<div class="tabset">


  <input type="radio" name="powershell-install" id="powershell-install-0" aria-controls="powershell-install-0" checked="checked">
  <label for="powershell-install-0">windows - choco</label>


  <input type="radio" name="powershell-install" id="powershell-install-1" aria-controls="powershell-install-1">
  <label for="powershell-install-1">Debian 10</label>


  <input type="radio" name="powershell-install" id="powershell-install-2" aria-controls="powershell-install-2">
  <label for="powershell-install-2">Ubuntu 18.04</label>


<div class="tab-panels">


<section id="powershell-install-0" class="tab-panel">
    <p>
	
		<!-- raw HTML omitted -->
<!-- raw HTML omitted -->
<p>The additional argument installs Explorer context menu so you can right-click and open in the folder you&rsquo;re in. Others are  documented in the <a href="https://chocolatey.org/packages/powershell-core#description">choco package</a>.</p>

	
    </p>
</section>


<section id="powershell-install-1" class="tab-panel">
    <p>
	
		<!-- raw HTML omitted -->
<!-- raw HTML omitted -->
<p>Taken from the <a href="https://docs.microsoft.com/en-us/powershell/scripting/install/installing-powershell-core-on-linux?view=powershell-7">PowerShell installation docs</a>.</p>

	
    </p>
</section>


<section id="powershell-install-2" class="tab-panel">
    <p>
	
		<!-- raw HTML omitted -->
<!-- raw HTML omitted -->
<p>Taken from the <a href="https://docs.microsoft.com/en-us/powershell/scripting/install/installing-powershell-core-on-linux?view=powershell-7">PowerShell installation docs</a>.</p>

	
    </p>
</section>

</div>
</div>
<h3 id="setup-oh-my-posh">Setup Oh-My-Posh</h3>
<p>If you want that delicious PowerShell prompt (akin to <a href="https://github.com/ohmyzsh/ohmyzsh">OhMyZsh</a> if you&rsquo;ve been using that on your Mac) you need <a href="https://github.com/JanDeDobbeleer/oh-my-posh">oh-my-posh</a>.</p>
<p>This provides extra information based on your current folder (<code>git status</code> being the most common).</p>
<p>Installation is quite trivial these days and it&rsquo;s well documented on the <a href="https://github.com/JanDeDobbeleer/oh-my-posh#installation">oh-my-posh</a> repo. Some of the glyph&rsquo;s may not render correctly (visible from the old Powershell prompt as below).</p>


<figure >
  
  <img
      
        src="https://www.thushanfernando.com/img/posts/windows-terminal-setup/powershell-terminal-glyph-issue.png"
      
        alt="PowerShell terminal missing glyphs with Oh-My-Posh."


         style="max-width: 100%;"
         />


    <figcaption>
      <span class="img--caption">
        Figure 1. PowerShell terminal missing glyphs with Oh-My-Posh.
        
      </span>
    </figcaption>
  
</figure>


<p>Windows Terminal, it&rsquo;s fine if you use the <code>Delugia Nerd</code> font:</p>


<figure >
  
  <img
      
        src="https://www.thushanfernando.com/img/posts/windows-terminal-setup/powershell-windows-terminal.png"
      
        alt="PowerShell on Windows Terminal with Oh-My-Posh &amp;amp; Delugia Nerd font."


         style="max-width: 100%;"
         />


    <figcaption>
      <span class="img--caption">
        Figure 2. PowerShell on Windows Terminal with Oh-My-Posh &amp;amp; Delugia Nerd font.
        
      </span>
    </figcaption>
  
</figure>


<p>You&rsquo;ll be the poshest <code>/dev</code> on the block now!</p>
<h2 id="windows-terminal-hacks">Windows Terminal Hacks</h2>
<p>A collection of hacks and interesting things you can do with Windows Terminal.</p>
<h3 id="elevate-powershell-easily">Elevate PowerShell Easily</h3>
<p>This is probably the most (currently) annoying thing with Windows Terminal and that&rsquo;s the inability to natively invoke an elevated process natively. We work around this with using <a href="https://github.com/gerardog/gsudo">gsudo</a> - an open-source <code>sudo</code> for Windows you can find in <a href="https://chocolatey.org/packages/gsudo/0.2.0.0">chocolatey</a>.</p>
<pre class="command-line" data-user="thushan" data-host="cody" data-output="">
<code class="language-powershell">
choco install gsudo
# update Path environment variable
refreshenv
</code>
</pre>
<p>Then add to the profile you want to elevate - I&rsquo;ve chosen a new elevated PowerShell for my <code>choco</code> goodness.</p>
<pre class="line-numbers"><code class="language-json">
{
    &#34;guid&#34;: &#34;{62c54bbd-c2c6-5271-96e7-009a87ff44bf}&#34;,
    &#34;name&#34;: &#34;PowerShell ⚡&#34;,
    &#34;commandline&#34;: &#34;gsudo powershell.exe&#34;,
    &#34;icon&#34; : &#34;ms-appx:///ProfileIcons/{61c54bbd-c2c6-5271-96e7-009a87ff44bf}.png&#34;,
    &#34;fontFace&#34;:  &#34;Delugia Nerd Font&#34;,
    &#34;hidden&#34;: false,
}
</code></pre>
<p>The UAC prompt will appear as normal and the tabbed process will be elevated!</p>
<p><strong>NOTE:</strong> This is a workaround until the official Windows Terminal supports it.</p>
<h3 id="setup-most-used-ssh-sessions--terminals--shells">Setup Most Used SSH Sessions / Terminals / Shells</h3>
<p>The great thing about <a href="https://conemu.github.io/">ConEmu</a> and now Windows Terminal is that you can add your custom SSH endpoints easily. If you SSH into several boxes regularly, set those up as terminals themselves in your list.</p>


<figure >
  
  <img
      
        src="https://www.thushanfernando.com/img/posts/windows-terminal-setup/windows-terminal-ssh.png"
      
        alt="Windows Terminal with SSH profiles to common endpoints."


         style="max-width: 100%;"
         />


    <figcaption>
      <span class="img--caption">
        Figure 3. Windows Terminal with SSH profiles to common endpoints.
        
      </span>
    </figcaption>
  
</figure>


<p>Here I&rsquo;ve got my FreeBSD and Linux box as specific profiles that can be activated via some shortcuts too.</p>
<pre class="line-numbers"><code class="language-json">
{
    &#34;guid&#34;: &#34;{4ddabb21-a88b-4c5e-863b-58067670f0cf}&#34;,
    &#34;name&#34;:  &#34;SSH Zeus 💻&#34;,
    &#34;tabTitle&#34;: &#34;SSH FreeBSD&#34;,
    &#34;commandline&#34;: &#34;ssh thushan@192.168.0.6&#34;,
    &#34;closeOnExit&#34;: true,
    &#34;useAcrylic&#34;: true
},    
{
    &#34;guid&#34;: &#34;{cdfaa442-3268-4ecc-87d2-aa547b7344ce}&#34;,
    &#34;name&#34;:  &#34;SSH Neo 💻&#34;,
    &#34;tabTitle&#34;: &#34;SSH Linux&#34;,
    &#34;commandline&#34;: &#34;ssh thushan@192.168.0.12&#34;,
    &#34;closeOnExit&#34;: true,
    &#34;useAcrylic&#34;: true
}
</code></pre>
<p>It&rsquo;s a good idea to add the <code>closeOnExit</code> setting so the tab closes when the SSH session ends.</p>
<h3 id="python-shell-in-windows-terminal">Python Shell in Windows Terminal</h3>
<p>If you use Python a lot, you can go straight to a python shell.</p>
<p>I&rsquo;ve installed <a href="https://www.python.org/downloads/">Python 3.8 (32bit)</a> and it resides in the path below. As I still maintain some Python 2.7.x things, I have both profiles in my Windows Terminal profile.</p>
<pre class="line-numbers"><code class="language-json">
{
    &#34;guid&#34;: &#34;{7241dc93-3df7-4334-852f-4fa62fab1fb4}&#34;,
    &#34;name&#34;:  &#34;Python v3.8 🐍&#34;,
    &#34;tabTitle&#34;: &#34;Python&#34;,
    &#34;commandline&#34;: &#34;%LOCALAPPDATA%\\Programs\\Python\\Python38-32\\python.exe&#34;,
    &#34;icon&#34; : &#34;%LOCALAPPDATA%\\Programs\\Python\\Python38-32\\DLLs\\py.ico&#34;,
    &#34;acrylicOpacity&#34;: 0.8,
    &#34;snapOnInput&#34; : true,
    &#34;closeOnExit&#34;: true,
    &#34;useAcrylic&#34;: true
}
</code></pre>
<h3 id="aws-shell-in-windows-terminal">AWS Shell in Windows Terminal</h3>
<p>If you thought having SSH endpoints was cool, you can even do that for your AWS Shell.</p>
<p>Make sure that Python3 is installed and that <code>pip</code> is available (included in v3.4+).</p>
<p>First install the <code>aws-shell</code> with pip (or follow <a href="https://github.com/awslabs/aws-shell">their recommended approach</a>):</p>
<pre class="command-line" data-user="thushan" data-host="neo" data-output="2-4">
<code class="language-bash">
pip3 install aws-shell
Collecting aws-shell
  Downloading aws_shell-0.2.1-py2.py3-none-any.whl (50 kB)
  ...
</code>
</pre>
<p>Then add a new profile:</p>
<pre class="line-numbers"><code class="language-json">
{
    &#34;guid&#34;: &#34;{fb83d3ea-2429-472b-be65-e8bc61b23553}&#34;,
    &#34;name&#34;:  &#34;AWS CLI ☁&#34;,
    &#34;tabTitle&#34;: &#34;aws&#34;,
    &#34;commandline&#34;: &#34;%LOCALAPPDATA%\\Programs\\Python\\Python38-32\\Scripts\\aws-shell.exe&#34;,
    &#34;icon&#34; : &#34;%LOCALAPPDATA%\\Programs\\Python\\Python38-32\\DLLs\\py.ico&#34;,
    &#34;acrylicOpacity&#34;: 0.8,
    &#34;snapOnInput&#34; : true,
    &#34;closeOnExit&#34;: true,
    &#34;useAcrylic&#34;: true
}
</code></pre>
<h3 id="configure-start-up-panes">Configure start-up panes</h3>
<p>You can create your perfect startup layout too via the command line with some nifty tricks.</p>
<p>For a new tab use <code>new-tab</code> with the profile specified with a <code>-p</code>. For example <code>wt.exe ; new-tab -p &quot;Bash&quot;</code> will by default open a new bash shell.</p>
<p>To split the pane, use the <code>split-pane</code> with the profile specified with a <code>-p</code> and whether to split Vertically <code>-V</code> or Horizontally <code>-H</code>. For example to split an instance of Ubuntu horizontally <code>split-pane -p &quot;Ubuntu&quot; -H;</code>. With this you can create a sequential splitting on panes to get the ideal layout you want. At this stage it&rsquo;s only customisable to equal splitting of panes (which reduces it&rsquo;s command line arg complexity too). There&rsquo;s more options in <a href="https://github.com/microsoft/terminal/blob/master/doc/user-docs/UsingCommandlineArguments.md">the documentation</a>.</p>
<p>The command line for the initial screenshot I have is:</p>
<div class="highlight"><pre tabindex="0" style="color:#f8f8f2;background-color:#272822;-moz-tab-size:4;-o-tab-size:4;tab-size:4;"><code class="language-shell" data-lang="shell"><span style="display:flex;"><span>wt.exe ; new-tab -p <span style="color:#e6db74">&#34;Bash&#34;</span> ; split-pane -p <span style="color:#e6db74">&#34;Ubuntu&#34;</span> -H; split-pane -p <span style="color:#e6db74">&#34;PowerShell&#34;</span> -V; split-pane -p <span style="color:#e6db74">&#34;PowerShell (admin)&#34;</span> -H
</span></span></code></pre></div><p>You can opt to resize the panes with <kbd>ALT</kbd> 
<kbd>SHIFT</kbd> 
<kbd>arrow-key</kbd> 
 as appropriate. You can close a pane with <kbd>CTRL</kbd> 
<kbd>SHIFT</kbd> 
<kbd>W</kbd> 
.</p>
<h2 id="windows-terminal-shortcuts">Windows Terminal Shortcuts</h2>
<h3 id="command-palette-for-windows-terminal">Command Palette for Windows Terminal</h3>


<figure >
  
  <img
      
        src="https://www.thushanfernando.com/img/posts/windows-terminal-setup/windows-terminal-command-palette.png"
      
        alt="Command Palette in Windows Terminal."


         style="max-width: 100%;"
         />


    <figcaption>
      <span class="img--caption">
        Figure 4. Command Palette in Windows Terminal.
        
      </span>
    </figcaption>
  
</figure>


<p>Yep, just like VSCode you can enable the Command Palette for Windows Terminal by using the <code>commandPalette</code> command.</p>
<div class="highlight"><pre tabindex="0" style="color:#f8f8f2;background-color:#272822;-moz-tab-size:4;-o-tab-size:4;tab-size:4;"><code class="language-json" data-lang="json"><span style="display:flex;"><span>{ <span style="color:#f92672">&#34;command&#34;</span>: <span style="color:#e6db74">&#34;commandPalette&#34;</span>, <span style="color:#f92672">&#34;keys&#34;</span>: <span style="color:#e6db74">&#34;ctrl+shift+p&#34;</span> }</span></span></code></pre></div>
<h3 id="search-for-tabs">Search for tabs</h3>
<p>New in v1.2+ is the ability to search for a tab, this is probably my most used feature from the previews and if you have lots of tabs open, it&rsquo;s a godsend.</p>
<p>To activate it, use the <code>tabSearch</code> command.</p>
<div class="highlight"><pre tabindex="0" style="color:#f8f8f2;background-color:#272822;-moz-tab-size:4;-o-tab-size:4;tab-size:4;"><code class="language-json" data-lang="json"><span style="display:flex;"><span>{ <span style="color:#f92672">&#34;command&#34;</span>: <span style="color:#e6db74">&#34;tabSearch&#34;</span>, <span style="color:#f92672">&#34;keys&#34;</span>: <span style="color:#e6db74">&#34;ctrl+f&#34;</span> }</span></span></code></pre></div>
<h2 id="my-settingsjson-file">My <code>settings.json</code> File</h2>
<p>This is my Windows Terminal <code>settings.json</code> file for reference only, it contains some specific things to my environment but you can see more concrete examples of the topics discussed above. It&rsquo;ll be updated as I tweak things.</p>
<script src="https://gist.github.com/thushan/90e9b0fb8b9cbc8eca674509a026adeb.js"></script>

]]></content><category scheme="https://www.thushanfernando.com/categories/windows" term="windows" label="windows"/><category scheme="https://www.thushanfernando.com/categories/how-to" term="how-to" label="how-to"/><category scheme="https://www.thushanfernando.com/tags/windows-terminal" term="windows-terminal" label="windows terminal"/><category scheme="https://www.thushanfernando.com/tags/bash" term="bash" label="bash"/><category scheme="https://www.thushanfernando.com/tags/powershell" term="powershell" label="powershell"/></entry><entry><title type="html">WordPress to Hugo</title><link href="https://www.thushanfernando.com/2020/07/wordpress-to-hugo/?utm_source=atom_feed" rel="alternate" type="text/html"/><link href="https://www.thushanfernando.com/index.php/2010/09/20/asp-net-session-cookie-crypto-attack-exploiting/?utm_source=atom_feed" rel="related" type="text/html" title="ASP.NET Session Cookie Crypto Attack Exploiting"/><link href="https://www.thushanfernando.com/index.php/2010/09/15/openindiana-announced-the-fork-to-oracles-opensolaris/?utm_source=atom_feed" rel="related" type="text/html" title="OpenIndiana Announced, the fork to Oracle’s OpenSolaris!"/><link href="https://www.thushanfernando.com/index.php/2010/07/28/think-this-is-funny-think-this-is-some-kind-of-mother-flipping-joke-mother-flippers-think-everythings-a-mother-flipping-joke/?utm_source=atom_feed" rel="related" type="text/html" title="What the flip are you looking at?"/><link href="https://www.thushanfernando.com/index.php/2010/04/03/google-shows-the-power-of-html-5-ports-quake-ii-to-run-in-browser/?utm_source=atom_feed" rel="related" type="text/html" title="Google shows the power of HTML 5, ports Quake II to run in browser!"/><link href="https://www.thushanfernando.com/index.php/2009/11/21/some-changes-in-net-bcl-4-0/?utm_source=atom_feed" rel="related" type="text/html" title="Some changes in .NET BCL 4.0"/><id>https://www.thushanfernando.com/2020/07/wordpress-to-hugo/</id><published>2020-07-12T07:42:40+00:00</published><updated>2020-08-26T22:23:39+10:00</updated><content type="html"><![CDATA[<p>In its fourth iteration (with almost a <a href="/archives">healthy 10 year hiatus</a>) I moved this blog from WordPress to Hugo recently. Static Site Generators (or SSGs) like <a href="https://gohugo.io/">Hugo</a> and <a href="https://jekyllrb.com/">Jekyll</a> are a breath of fresh air for blog-centric websites. Not having to constantly be concerned with updates for security issues like the former, being able to write content in markdown, having a nice continuous deployment pipeline, no databases to worry about and the added bonus of being able to host it easily, how can you not?</p>
<p>If you intend to go down this path, here are some of my learnings and notes from my journey. This isn&rsquo;t a step-by-step walk through, merely notes from my travels.</p>
<h2 id="preamble">Preamble</h2>
<p>Firstly, this site was built with <a href="https://gohugo.io/">Hugo</a> with <a href="https://github.com/thushan/hyde-hyde">my fork</a> of a <a href="https://github.com/htr3n/hyde-hyde">fork</a> of the <a href="https://github.com/spf13/hyde">hyde-hyde</a> theme by <a href="https://spf13.com/">Steve Francia</a>. Having started my <a href="http://www.golang.org">golang</a> journey in 2016, there was nothing that Steve hadn&rsquo;t touched in go that you wouldn&rsquo;t be using right now - including <a href="https://spf13.com/project/hugo/">Hugo itself</a>.</p>
<p>I did give Jekyll a go a while back, but wasn&rsquo;t a fan of Ruby (but do like the Liquid template library compared to Hugo for things like conditionals). For instance, this is what template conditionals look like in Jekyll:</p>
<pre tabindex="0"><code>{% if page.is_post and page.isArchived %}
  &lt;!-- Do things --&gt;
{% endif %}
</code></pre><p>And the same in Hugo:</p>
<pre tabindex="0"><code>{{ if (and (eq .Type &#34;post&#34;) (isset .Params &#34;isArchived&#34;)) }}
  &lt;!-- Do things --&gt;
{{ end }}
</code></pre><p>Themes/look and feel aside - because that&rsquo;s a very personal customisation, the migration off of WordPress was a little finicky - largely in part due to my content. The blog had content from LiveJournal (2003-2005) to Community Server (2005-2008) that I had from <a href="https://www.developerfusion.com">developerfusion</a>&rsquo;s old <a href="https://en.wikipedia.org/wiki/Telligent_Community">CommunityServer</a> blog engine that was migrated to WordPress which proved to be quite troublesome. You should have far better luck!</p>
<p>My focus was only on the content &amp; the initial meta-data/taxonomies (tags/categories) &amp; url patterns, didn&rsquo;t care about replicating the theme, plugins, comments or anything else.</p>
<p>The blog is hosted on <a href="https://www.netlify.com/">Netlify</a> and source is on <a href="http://www.github.com">Github</a>. <a href="https://pages.github.com/">Github Pages</a> was in consideration too early on.</p>
<p>Comments are powered by <a href="http://www.graphcomment.com">GraphComment</a>, the syntax highlighting is <a href="https://prismjs.com/">PrismJS</a>.</p>
<h2 id="migrating-content-out-of-wordpress">Migrating Content out of WordPress</h2>
<p>For my musings, I took a WordPress Backup via <a href="https://wordpress.org/plugins/updraftplus/">UpdraftPlus</a> to try couple of approaches within a containerised local instance.</p>
<h3 id="wordpress-docker-stack">WordPress Docker Stack</h3>
<p>First and foremost, you&rsquo;ll need a stack for Docker that includes WordPress and MySQL - specific to your installation. (so ensure that the <a href="https://hub.docker.com/_/wordpress?tab=tags">WordPress tag</a> matches one for your installation, as well as the <a href="https://hub.docker.com/_/mysql?tab=tags">MySQL tag</a>).</p>
<div class="highlight"><pre tabindex="0" style="color:#f8f8f2;background-color:#272822;-moz-tab-size:4;-o-tab-size:4;tab-size:4;"><code class="language-yaml" data-lang="yaml"><span style="display:flex;"><span><span style="color:#f92672">version</span>: <span style="color:#e6db74">&#39;3.1&#39;</span>
</span></span><span style="display:flex;"><span>
</span></span><span style="display:flex;"><span><span style="color:#f92672">services</span>:
</span></span><span style="display:flex;"><span>
</span></span><span style="display:flex;"><span>  <span style="color:#f92672">wordpress</span>:
</span></span><span style="display:flex;"><span>    <span style="color:#f92672">image</span>: <span style="color:#ae81ff">wordpress:5.1.0-php7.3-fpm-alpine</span>
</span></span><span style="display:flex;"><span>    <span style="color:#f92672">ports</span>:
</span></span><span style="display:flex;"><span>      - <span style="color:#ae81ff">8080</span>:<span style="color:#ae81ff">80</span>
</span></span><span style="display:flex;"><span>    <span style="color:#f92672">environment</span>:
</span></span><span style="display:flex;"><span>      <span style="color:#f92672">WORDPRESS_DB_HOST</span>: <span style="color:#ae81ff">db</span>
</span></span><span style="display:flex;"><span>      <span style="color:#f92672">WORDPRESS_DB_USER</span>: <span style="color:#ae81ff">wordpress</span>
</span></span><span style="display:flex;"><span>      <span style="color:#f92672">WORDPRESS_DB_PASSWORD</span>: <span style="color:#ae81ff">super-secret-password</span>
</span></span><span style="display:flex;"><span>      <span style="color:#f92672">WORDPRESS_DB_NAME</span>: <span style="color:#ae81ff">wordpress_prod</span>
</span></span><span style="display:flex;"><span>    <span style="color:#f92672">volumes</span>:
</span></span><span style="display:flex;"><span>      - <span style="color:#ae81ff">wordpress:/var/www/html</span>
</span></span><span style="display:flex;"><span>
</span></span><span style="display:flex;"><span>  <span style="color:#f92672">db</span>:
</span></span><span style="display:flex;"><span>    <span style="color:#f92672">image</span>: <span style="color:#ae81ff">mysql:5.7</span>
</span></span><span style="display:flex;"><span>    <span style="color:#f92672">environment</span>:
</span></span><span style="display:flex;"><span>      <span style="color:#f92672">MYSQL_DATABASE</span>: <span style="color:#ae81ff">wordpress_prod</span>
</span></span><span style="display:flex;"><span>      <span style="color:#f92672">MYSQL_USER</span>: <span style="color:#ae81ff">wordpress</span>
</span></span><span style="display:flex;"><span>      <span style="color:#f92672">MYSQL_PASSWORD</span>: <span style="color:#ae81ff">super-secret-password</span>
</span></span><span style="display:flex;"><span>      <span style="color:#f92672">MYSQL_RANDOM_ROOT_PASSWORD</span>: <span style="color:#e6db74">&#39;1&#39;</span>
</span></span><span style="display:flex;"><span>    <span style="color:#f92672">volumes</span>:
</span></span><span style="display:flex;"><span>      - <span style="color:#ae81ff">db:/var/lib/mysql</span>
</span></span><span style="display:flex;"><span>
</span></span><span style="display:flex;"><span><span style="color:#f92672">volumes</span>:
</span></span><span style="display:flex;"><span>  <span style="color:#f92672">wordpress</span>:
</span></span><span style="display:flex;"><span>  <span style="color:#f92672">db</span>:
</span></span></code></pre></div><p>Start the stack with either <code>docker-compose</code> or <code>docker stack</code>, I used <code>docker-compose</code>:</p>
<pre class="command-line" data-user="thushan" data-host="cody" data-output="2-19">
<code class="language-powershell">
docker-compose -f stack.yml up
Creating network "_docker_default" with the default driver
Creating volume "docker_wordpress" with default driver
Creating volume "docker_db" with default driver
...
4310a0bf42d: Pull complete
d398726627fd: Pull complete
Digest: sha256:da58f943b94721d46e87d5de208dc07302a8b13e638cd1d24285d222376d6d84
Status: Downloaded newer image for mysql:5.7
Creating docker_db_1        ... done
Creating docker_wordpress_1 ... done
Attaching to docker_db_1, docker_wordpress_1
docker_db_1  | 2020-08-21 02:55:37+00:00 [Note] [Entrypoint]: Entrypoint script for MySQL Server 5.7.31-1debian10 started.
docker_db_1  | 2020-08-21 02:55:37+00:00 [Note] [Entrypoint]: Switching to dedicated user 'mysql'
docker_wordpress_1 | WordPress not found in /var/www/html - copying now...
docker_db_1  | 2020-08-21 02:55:37+00:00 [Note] [Entrypoint]: Entrypoint script for MySQL Server 5.7.31-1debian10 started.
docker_db_1  | 2020-08-21 02:55:37+00:00 [Note] [Entrypoint]: Initializing database files
docker_db_1  | 2020-08-21T02:55:37.595167Z 0 [Warning] TIMESTAMP with implicit DEFAULT value is deprecated. Please use --explicit_defaults_for_t
...
</code>
</pre>
<p>Once the above pulls the images and sets up the stack, you&rsquo;ll be able to setup the initial configuration for WordPress by visiting <code>http://localhost:8080</code>. This is also where I restored the <a href="https://updraftplus.com/faqs/restore-site-updraftplus/">UpdraftPlus</a> backup.</p>
<p>The important paths from the above stack are:</p>
<ul>
<li>Themes - <code>/var/www/html/wp-content/themes/</code></li>
<li>Plugin - <code>/var/www/html/wp-content/plugins/</code></li>
</ul>
<p>I didn&rsquo;t really look at the Themes, mostly focused on copying the <a href="https://wordpress.org/plugins/updraftplus/">UpdraftPlus</a> plugin and the <a href="https://updraftplus.com/faqs/how-do-i-migrate-to-a-new-site-location/">migration setup</a>.</p>
<h3 id="migration-approaches">Migration Approaches</h3>
<p>This is where you&rsquo;ll spend most of your fun times determining what works for your particular setup. It&rsquo;s vital that you not only worry about the content but also the URL patterns so that you don&rsquo;t break existing links.</p>
<p>For my setup, all posts were <code>/index.php/[year]/[month]/[day]/[title]</code> and wanted it maintained.</p>
<h4 id="export-to-hugo">Export to Hugo</h4>
<p><a href="(https://github.com/SchumacherFM/wordpress-to-hugo-exporter)">Export to Hugo</a> is the recommended approach from the <a href="https://gohugo.io/tools/migrations/#wordpress">Hugo Migrations</a> page. It sounded too good to be true and all the right features:</p>
<ul>
<li>Converts all posts, pages, and settings from WordPress for use in Hugo</li>
<li>Export what your users see, not what the database stores (runs post content through the_content filter prior to export, allowing third-party plugins to modify the output)</li>
<li>Converts all <code>post_content</code> to Markdown Extra (using Markdownify)</li>
<li>Converts all <code>post_meta</code> and fields within the <code>wp_posts</code> table to YAML front matter for parsing by Hugo.</li>
<li>Exports optionally comments as part of their posts. This features needs to be enabled manually by editing the PHP source code. See file <code>hugo-export.php</code> at line ~40.</li>
<li>Export private posts and drafts. They are marked as drafts as well and won&rsquo;t get published with Hugo.</li>
<li>Generates a <code>config.yaml</code> with all settings in the <code>wp_options</code> table</li>
<li>Outputs a single zip file with <code>config.yaml</code>, pages, and post folder containing .md files for each post in the proper Hugo naming convention.</li>
<li>No settings. Just a single click.</li>
</ul>
<p>Activate the plugin and single click! However, if you find that the script is failing due to execution time or permission issues, you can (as I did) use the CLI (why it was containerised):</p>
<pre class="command-line" data-user="thushan" data-host="wp-docker" data-output="3-4">
<code class="language-bash">
cd wp-content/plugins/wordpress-to-hugo-exporter/
php hugo-export-cli.php
This is your file!
/tmp/wp-hugo.zip
</code>
</pre>
<p>Unfortunately, this plugin didn&rsquo;t quite work for me due to my varying content &amp; structure - mind you, this was pre-2.0 release that seems current now. The zip file was created but the content inside the markdown files were not consistent nor all of the posts from WordPress.</p>
<h4 id="export-to-jekyll">Export to Jekyll</h4>
<p><a href="https://wordpress.org/plugins/jekyll-exporter/">Export to Jekyll</a> is in a similar vein to the Hugo exporter (same author?) but it&rsquo;s in (!) Jekyll format:</p>
<ul>
<li>Converts all posts, pages, and settings from WordPress for use in Jekyll</li>
<li>Export what your users see, not what the database stores (runs post content through the_content filter prior to export, allowing third-party plugins to modify the output)</li>
<li>Converts all <code>post_content</code> to Markdown Extra (using Markdownify)</li>
<li>Converts all <code>post_meta</code> and fields within the <code>wp_posts</code> table to YAML front matter for parsing by Jekyll</li>
<li>Generates a <code>_config.yml</code> with all settings in the <code>wp_options</code> table</li>
<li>Outputs a single zip file with <code>_config.yml</code>, pages, and <code>_posts</code> folder containing .md files for each post in the proper Jekyll naming convention</li>
<li>No settings. Just a single click.</li>
</ul>
<p>This adds an additional step to your migration, but (for me) this approach worked and it exported content, meta-data and taxonomies with ease. What&rsquo;s also important is that it automatically determined my URL patterns and matched that eg.</p>
<div class="highlight"><pre tabindex="0" style="color:#f8f8f2;background-color:#272822;-moz-tab-size:4;-o-tab-size:4;tab-size:4;"><code class="language-markdown" data-lang="markdown"><span style="display:flex;"><span>---
</span></span><span style="display:flex;"><span>title: The anatomy of the Ext4 File-System
</span></span><span style="display:flex;"><span>type: posts
</span></span><span style="display:flex;"><span>date: 2009-02-23T12:21:23+00:00
</span></span><span style="display:flex;"><span>url: /index.php/2009/02/23/the-anatomy-of-the-ext4-file-system/
</span></span><span style="display:flex;"><span>...
</span></span></code></pre></div><h2 id="importing-into-hugo">Importing into Hugo</h2>
<p>This was probably the least painful part - whilst I added this step by using the exporter. Hugo convienently has a <a href="https://gohugo.io/commands/hugo_import_jekyll/">Jekyll importer</a>.</p>
<pre class="command-line" data-user="thushan" data-host="cody" data-output="3-5">
<code class="language-bash">
mkdir blog
hugo import jekyll jekyll-files blog
Importing...
Congratulations! 486 post(s) imported!
Now, start Hugo by yourself:
</code>
</pre>
<p>That&rsquo;s it, it&rsquo;s now ready to serve but before you do, it&rsquo;s best you read through the <a href="https://gohugo.io/variables/site/">Hugo Site Variables</a> documentation to separate out your local development and production configurations.</p>
<p>Add a basic theme to get you started:</p>
<pre class="command-line" data-user="thushan" data-host="cody" data-output="">
<code class="language-bash">
git clone https://github.com/spf13/herring-cove.git blog/themes/herring-cove
</code>
</pre>
<p>Then fire it up:</p>
<pre class="command-line" data-user="thushan" data-host="cody" data-output="">
<code class="language-bash">
hugo server --buildDrafts --port 1337 --theme=herring-cove
</code>
</pre>
<p>Lighting fast build and serve.</p>
<h2 id="manual-curation">Manual Curation</h2>
<p>Once you have something resembling a Hugo site rendering, it&rsquo;s evident things need to be curated, culled and formatting fixed up. There are some tools further down that helped in this regard to convert inline HTML into Markdown (conversion process failed to convert them). This is especially important on newer versions of Hugo v0.60+ as it uses <code>Goldmark</code> vs the previous <code>blackfriday</code> handler which supported inline HTML.</p>
<p>During this phase, it&rsquo;ll be helpful to go back to <code>BlackFriday</code> in your <code>config.toml</code></p>
<div class="highlight"><pre tabindex="0" style="color:#f8f8f2;background-color:#272822;-moz-tab-size:4;-o-tab-size:4;tab-size:4;"><code class="language-toml" data-lang="toml"><span style="display:flex;"><span>[<span style="color:#a6e22e">markup</span>]
</span></span><span style="display:flex;"><span>  <span style="color:#a6e22e">defaultMarkdownHandler</span> = <span style="color:#e6db74">&#34;blackfriday&#34;</span>
</span></span></code></pre></div><p>Then when you&rsquo;re ready to boogie, switch back to <code>Goldmark</code> and force unsafe code not to render:</p>
<div class="highlight"><pre tabindex="0" style="color:#f8f8f2;background-color:#272822;-moz-tab-size:4;-o-tab-size:4;tab-size:4;"><code class="language-toml" data-lang="toml"><span style="display:flex;"><span>[<span style="color:#a6e22e">markup</span>]
</span></span><span style="display:flex;"><span>  <span style="color:#a6e22e">defaultMarkdownHandler</span> = <span style="color:#e6db74">&#34;goldmark&#34;</span>
</span></span><span style="display:flex;"><span>   [<span style="color:#a6e22e">markup</span>.<span style="color:#a6e22e">goldmark</span>]
</span></span><span style="display:flex;"><span>    [<span style="color:#a6e22e">markup</span>.<span style="color:#a6e22e">goldmark</span>.<span style="color:#a6e22e">extensions</span>]
</span></span><span style="display:flex;"><span>      <span style="color:#a6e22e">unsafe</span> = <span style="color:#66d9ef">false</span>
</span></span></code></pre></div><p>This is also the best time to decide on a <a href="https://themes.gohugo.io/">Hugo theme</a> and get your basic layout sorted. I spent a fair chunk of mine customising the <a href="https://github.com/htr3n/hyde-hyde">hyde-hyde</a> fork and adding relevant short-codes etc.</p>
<h3 id="curated-things">Curated Things</h3>
<ul>
<li>Images and links that were deemed Mixed-Content (so http based images being used on https)</li>
<li>Span tags littered throughout the MD files because of the previous syntax highlighter used on WordPress</li>
<li>Rewriting Codeblocks to use Hugo shortcodes</li>
<li>Rewriting bash/powershell command lines to use Hugo Shortcodes</li>
<li>Removing redundant or overly complex tag taxonomies</li>
<li>Reducing Categories and relinking uncategorised areas (not sure why that happened)</li>
<li>Rewriting internal URLs that looked for WordPress specific taxonomies (Eg. <code>/index.php/</code>tag vs <code>/tags</code>). Some nifty <code>sed</code> scripts were used (doco&rsquo;d below)</li>
</ul>
<h2 id="hosting-on-netlify">Hosting on Netlify</h2>
<p>One of the primary reasons I picked Hugo was because of the static HTML files and content that&rsquo;s hugely CDN&rsquo;able! My initial thought was to just use my AWS account and run this off an S3 bucket.</p>
<p>But Netlify brings so much to the table, it was hard to consider anything else - outside of it having a <a href="https://www.netlify.com/pricing/#features">free tier</a> (not too relevant for me).</p>
<ul>
<li><strong>Easy Continuous Deployment</strong> Trivial setup of CD via a <code>netlify.toml</code> file (mines below but you can use it too!)</li>
<li><strong>Super fast deployment &amp; updates</strong> Honestly, it&rsquo;s deployed and ready in minutes with full build history.</li>
<li><strong>Branch Deployment</strong> This is another trick up Netlify&rsquo;s sleeve and it was so useful when configuring the theme and backend (front-end) bits.</li>
<li><strong>Asset Optimisation</strong> They&rsquo;ll auto-optimise your assets before it hits their CDN</li>
<li><strong>SSL Included</strong> Configured with LetsEncrypt it&rsquo;s easily setup as per their <a href="https://docs.netlify.com/domains-https/https-ssl/#netlify-managed-certificates">ever helpful documentation</a>.</li>
</ul>
<p>The entire setup &amp; deployment from local Hugo to <code>*name*.netlify.app</code> was about 30 minutes (and 10mins of that was the <code>baseURL</code> issue mentioned below)!</p>
<h3 id="ssl-goodness">SSL Goodness</h3>
<p>Once you move your DNS hosting to Netlify though, you&rsquo;ll be able to seamlessly manage your SSL certificates too&hellip;</p>


<figure >
  
  <img
      
        src="https://www.thushanfernando.com/img/posts/wordpress-to-hugo/netlify-dns-ssl.png"
      
        alt="Netlify provisioning SSL Certs via Lets Encrypt"


         style="max-width: 100%;"
         />


    <figcaption>
      <span class="img--caption">
        Figure 1. Netlify provisioning SSL Certs via Lets Encrypt
        
      </span>
    </figcaption>
  
</figure>


<p>&hellip;once the DNS propagates:</p>


<figure >
  
  <img
      
        src="https://www.thushanfernando.com/img/posts/wordpress-to-hugo/netlify-dns-ssl-provisioned.png"
      
        alt="DNS Propagated, SSL Certs provisioned!"


         style="max-width: 100%;"
         />


    <figcaption>
      <span class="img--caption">
        Figure 2. DNS Propagated, SSL Certs provisioned!
        
      </span>
    </figcaption>
  
</figure>


<p>Couldn&rsquo;t be easier! Make sure you leave a donation with the <a href="https://letsencrypt.org/donate/">Let&rsquo;s Encrypt</a> folks for their amazing work.</p>
<h3 id="some-configtoml-things">Some <code>config.toml</code> Things&hellip;</h3>
<p>Ensure that your configuration has a relative <code>baseURL</code> so relative pathing works correctly - this took me a bit of fiddling initially.</p>
<div class="highlight"><pre tabindex="0" style="color:#f8f8f2;background-color:#272822;-moz-tab-size:4;-o-tab-size:4;tab-size:4;"><code class="language-toml" data-lang="toml"><span style="display:flex;"><span><span style="color:#a6e22e">baseurl</span> = <span style="color:#e6db74">&#34;/&#34;</span>
</span></span><span style="display:flex;"><span><span style="color:#a6e22e">languageCode</span> = <span style="color:#e6db74">&#34;en-us&#34;</span>
</span></span><span style="display:flex;"><span>...</span></span></code></pre></div>
<h3 id="reusable-netlifytoml">Reusable <code>netlify.toml</code></h3>
<p>Finally the Netlify hosting configuration with the (at the time) latest release of Hugo to use.</p>
<div class="highlight"><pre tabindex="0" style="color:#f8f8f2;background-color:#272822;-moz-tab-size:4;-o-tab-size:4;tab-size:4;"><code class="language-toml" data-lang="toml"><span style="display:flex;"><span>[<span style="color:#a6e22e">build</span>]
</span></span><span style="display:flex;"><span><span style="color:#a6e22e">publish</span> = <span style="color:#e6db74">&#34;public&#34;</span>
</span></span><span style="display:flex;"><span><span style="color:#a6e22e">command</span> = <span style="color:#e6db74">&#34;hugo --gc --minify&#34;</span>
</span></span><span style="display:flex;"><span>
</span></span><span style="display:flex;"><span>[<span style="color:#a6e22e">context</span>.<span style="color:#a6e22e">production</span>.<span style="color:#a6e22e">environment</span>]
</span></span><span style="display:flex;"><span><span style="color:#a6e22e">HUGO_VERSION</span> = <span style="color:#e6db74">&#34;0.74.3&#34;</span>
</span></span><span style="display:flex;"><span><span style="color:#a6e22e">HUGO_ENV</span> = <span style="color:#e6db74">&#34;production&#34;</span>
</span></span><span style="display:flex;"><span><span style="color:#a6e22e">HUGO_ENABLEGITINFO</span> = <span style="color:#e6db74">&#34;true&#34;</span>
</span></span><span style="display:flex;"><span>
</span></span><span style="display:flex;"><span>[<span style="color:#a6e22e">context</span>.<span style="color:#a6e22e">split1</span>]
</span></span><span style="display:flex;"><span><span style="color:#a6e22e">command</span> = <span style="color:#e6db74">&#34;hugo --gc --minify --enableGitInfo&#34;</span>
</span></span><span style="display:flex;"><span>
</span></span><span style="display:flex;"><span>[<span style="color:#a6e22e">context</span>.<span style="color:#a6e22e">split1</span>.<span style="color:#a6e22e">environment</span>]
</span></span><span style="display:flex;"><span><span style="color:#a6e22e">HUGO_VERSION</span> = <span style="color:#e6db74">&#34;0.74.3&#34;</span>
</span></span><span style="display:flex;"><span><span style="color:#a6e22e">HUGO_ENV</span> = <span style="color:#e6db74">&#34;production&#34;</span>
</span></span><span style="display:flex;"><span>
</span></span><span style="display:flex;"><span>[<span style="color:#a6e22e">context</span>.<span style="color:#a6e22e">deploy-preview</span>]
</span></span><span style="display:flex;"><span><span style="color:#a6e22e">command</span> = <span style="color:#e6db74">&#34;hugo --gc --minify --buildFuture -b $DEPLOY_PRIME_URL&#34;</span>
</span></span><span style="display:flex;"><span>
</span></span><span style="display:flex;"><span>[<span style="color:#a6e22e">context</span>.<span style="color:#a6e22e">deploy-preview</span>.<span style="color:#a6e22e">environment</span>]
</span></span><span style="display:flex;"><span><span style="color:#a6e22e">HUGO_VERSION</span> = <span style="color:#e6db74">&#34;0.74.3&#34;</span>
</span></span><span style="display:flex;"><span>
</span></span><span style="display:flex;"><span>[<span style="color:#a6e22e">context</span>.<span style="color:#a6e22e">branch-deploy</span>]
</span></span><span style="display:flex;"><span><span style="color:#a6e22e">command</span> = <span style="color:#e6db74">&#34;hugo --gc --minify -b $DEPLOY_PRIME_URL&#34;</span>
</span></span><span style="display:flex;"><span>
</span></span><span style="display:flex;"><span>[<span style="color:#a6e22e">context</span>.<span style="color:#a6e22e">branch-deploy</span>.<span style="color:#a6e22e">environment</span>]
</span></span><span style="display:flex;"><span><span style="color:#a6e22e">HUGO_VERSION</span> = <span style="color:#e6db74">&#34;0.74.3&#34;</span>
</span></span><span style="display:flex;"><span>
</span></span><span style="display:flex;"><span>[<span style="color:#a6e22e">context</span>.<span style="color:#a6e22e">next</span>.<span style="color:#a6e22e">environment</span>]
</span></span><span style="display:flex;"><span><span style="color:#a6e22e">HUGO_ENABLEGITINFO</span> = <span style="color:#e6db74">&#34;true&#34;</span>
</span></span><span style="display:flex;"><span>
</span></span><span style="display:flex;"><span>[[<span style="color:#a6e22e">headers</span>]]
</span></span><span style="display:flex;"><span>  <span style="color:#a6e22e">for</span> = <span style="color:#e6db74">&#34;atom.*&#34;</span>
</span></span><span style="display:flex;"><span>  [<span style="color:#a6e22e">headers</span>.<span style="color:#a6e22e">values</span>]
</span></span><span style="display:flex;"><span>    <span style="color:#a6e22e">Content-Type</span> = <span style="color:#e6db74">&#34;application/atom+xml; charset=UTF-8&#34;</span>
</span></span><span style="display:flex;"><span>[[<span style="color:#a6e22e">headers</span>]]
</span></span><span style="display:flex;"><span>  <span style="color:#a6e22e">for</span> = <span style="color:#e6db74">&#34;*.atom&#34;</span>
</span></span><span style="display:flex;"><span>  [<span style="color:#a6e22e">headers</span>.<span style="color:#a6e22e">values</span>]
</span></span><span style="display:flex;"><span>    <span style="color:#a6e22e">Content-Type</span> = <span style="color:#e6db74">&#34;application/atom+xml; charset=UTF-8&#34;</span></span></span></code></pre></div>
<p>The Hugo site has <a href="https://gohugo.io/hosting-and-deployment/hosting-on-netlify/#build-and-deploy-site">amazing instructions on this</a>.</p>
<h3 id="setup-redirects-with-_redirects">Setup Redirects with <code>_redirects</code></h3>
<p>Migrating would also require some redirection of URLs to the new Hugo style - especially IIS-hosted WordPress to Hugo. <a href="https://docs.netlify.com/routing/redirects/#syntax-for-the-redirects-file">Netlify&rsquo;s</a> documentation has an example that explains this, but here&rsquo;s my <code>_redirects</code> file.</p>
<p>Remember to place this in the <code>/static</code> folder so it correctly puts it in the root once deployed.</p>
<div class="highlight"><pre tabindex="0" style="color:#f8f8f2;background-color:#272822;-moz-tab-size:4;-o-tab-size:4;tab-size:4;"><code class="language-toml" data-lang="toml"><span style="display:flex;"><span><span style="color:#960050;background-color:#1e0010">/</span><span style="color:#a6e22e">index</span>.<span style="color:#a6e22e">php</span>         <span style="color:#960050;background-color:#1e0010">/</span>
</span></span><span style="display:flex;"><span><span style="color:#960050;background-color:#1e0010">/</span><span style="color:#a6e22e">index</span>.<span style="color:#a6e22e">php</span><span style="color:#960050;background-color:#1e0010">/</span><span style="color:#a6e22e">feed</span>   <span style="color:#960050;background-color:#1e0010">/</span><span style="color:#a6e22e">feed</span>.<span style="color:#a6e22e">xml</span>
</span></span><span style="display:flex;"><span><span style="color:#960050;background-color:#1e0010">/</span><span style="color:#a6e22e">index</span>.<span style="color:#a6e22e">php</span><span style="color:#960050;background-color:#1e0010">/</span><span style="color:#a6e22e">about</span>   <span style="color:#960050;background-color:#1e0010">/</span><span style="color:#a6e22e">about</span>
</span></span><span style="display:flex;"><span><span style="color:#960050;background-color:#1e0010">/</span><span style="color:#a6e22e">index</span>.<span style="color:#a6e22e">php</span><span style="color:#960050;background-color:#1e0010">/</span><span style="color:#a6e22e">contact-me</span> <span style="color:#960050;background-color:#1e0010">/</span><span style="color:#a6e22e">about</span>
</span></span><span style="display:flex;"><span><span style="color:#960050;background-color:#1e0010">/</span><span style="color:#a6e22e">index</span>.<span style="color:#a6e22e">php</span><span style="color:#960050;background-color:#1e0010">/</span><span style="color:#a6e22e">category</span> <span style="color:#960050;background-color:#1e0010">/</span><span style="color:#a6e22e">categories</span>
</span></span><span style="display:flex;"><span><span style="color:#960050;background-color:#1e0010">/</span><span style="color:#a6e22e">index</span>.<span style="color:#a6e22e">php</span><span style="color:#960050;background-color:#1e0010">/</span><span style="color:#a6e22e">tag</span>     <span style="color:#960050;background-color:#1e0010">/</span><span style="color:#a6e22e">tags</span>
</span></span></code></pre></div><p>Finally, you&rsquo;ll also want to tell Hugo to <code>disableAliases</code> as you&rsquo;re letting Netlify manage that now - in <code>config.toml</code>:</p>
<div class="highlight"><pre tabindex="0" style="color:#f8f8f2;background-color:#272822;-moz-tab-size:4;-o-tab-size:4;tab-size:4;"><code class="language-toml" data-lang="toml"><span style="display:flex;"><span><span style="color:#a6e22e">disableAliases</span> = <span style="color:#66d9ef">true</span>
</span></span></code></pre></div><h2 id="dns-configuration">DNS Configuration</h2>
<p>You may want to opt to use the (now live) <a href="https://www.netlify.com/blog/2020/03/26/how-to-set-up-netlify-dns-custom-domains-cname-a-records/">Netlify DNS</a> service instead of having to update the DNS on your Domain Registrar&rsquo;s side. Makes managing your domain easier if it&rsquo;s solely dedicated to the Hugo site.</p>
<p>I opted to use the <a href="https://docs.netlify.com/domains-https/netlify-dns/">Netlify&rsquo;s DNS</a> to handle my DNS needs.</p>
<ul>
<li>Copy <strong>MX</strong> Records to maintain email services - <a href="https://support.google.com/a/answer/140034?hl=en">Google Suite MX Records</a></li>
<li>Copy <strong>TXT</strong> Record for SPF <a href="https://support.google.com/a/answer/33786?hl=en">Google Suite SPF</a></li>
<li>Copy <strong>A</strong> Records</li>
<li>Copy <strong>CNAME</strong> Records</li>
</ul>
<p>Then followed the setup on the <a href="https://app.netlify.com">Netlify site</a>.</p>
<h2 id="tools--scripts">Tools &amp; Scripts</h2>
<p>Some insanely useful tools I made use of during the migration:</p>
<ul>
<li><a href="https://jmalarcon.github.io/markdowntables/">markdownTables</a> for converting HTML Tables into nice markdown representations.</li>
<li><a href="https://domchristie.github.io/turndown/">turndown</a> HTML to Markdown conversion for adjusting markup missed by the conversion process that left Anchor Tags/floating formatting artefacts.</li>
</ul>
<h3 id="remove-the-author-from-md-files">Remove the Author from MD files</h3>
<p>This may be a remanent of the Jekyll export, but all my archived posts had an <code>Author</code> tag which made RSS feeds a bit confused. Removing those with some <code>sed</code>:</p>
<div class="highlight"><pre tabindex="0" style="color:#f8f8f2;background-color:#272822;-moz-tab-size:4;-o-tab-size:4;tab-size:4;"><code class="language-bash" data-lang="bash"><span style="display:flex;"><span>find . -name <span style="color:#e6db74">&#34;*.md&#34;</span> -type f | xargs sed -i -e <span style="color:#e6db74">&#39;/author: Thushan Fernando/d&#39;</span></span></span></code></pre></div>
<h3 id="mark-old-posts-as-archived">Mark old posts as <code>archived</code></h3>
<p>Wanted to ensure a old content was tagged appropriately, so adding an <code>isArchived</code> flag was easy <code>sed</code> than done:</p>
<div class="highlight"><pre tabindex="0" style="color:#f8f8f2;background-color:#272822;-moz-tab-size:4;-o-tab-size:4;tab-size:4;"><code class="language-bash" data-lang="bash"><span style="display:flex;"><span>find . -name <span style="color:#e6db74">&#34;*.md&#34;</span> -type f | xargs sed -i -e <span style="color:#e6db74">&#39;/type: posts/a isarchived: true&#39;</span></span></span></code></pre></div>
]]></content><category scheme="https://www.thushanfernando.com/categories/news" term="news" label="News"/><category scheme="https://www.thushanfernando.com/tags/wordpress" term="wordpress" label="wordpress"/><category scheme="https://www.thushanfernando.com/tags/hugo" term="hugo" label="hugo"/><category scheme="https://www.thushanfernando.com/tags/jekyll" term="jekyll" label="jekyll"/><category scheme="https://www.thushanfernando.com/tags/netlify" term="netlify" label="netlify"/></entry></feed>